Tag Archives: Vmware

Manually Remove I/O Filters From vSphere VM

I was attempting to move a VM from one host to another, and received the fallowing error: “Host does not support the virtual hardware configuration of virtual machine. The IO Filters(s) XXXX configured on the VM’s disk are not installed on the destination host.

At one point, I was using a VM accelerator solution that was not cleanly removed. It took me awhile to figure out how to remove the IO filter from the VM, so hopefully this guide will save you some time.

Part 1 – Remove setting from the VM

After searching the config files of the VM, I came across the VM’s VMDK descriptor file. This is not the storage VMDK file itself, but the 1KB sized descriptor file which I had to edit.

There are two lines that contain configurations for the IO filter, and both need to be removed. These are the ddb.iofilters and ddb.sidecars settings. Both lines can just be removed and the file saved.

Upon trying to migrate the VM after removing these lines, I received the same error as before. I needed to make the host aware of these changes somehow. This was achieved by right-clicking the VM –> VM Policies –> Edit VM Storage Policies..

I didn’t have to change anything, but just needed to click OK.

After doing those tasks, I was able to successfully migrate the VM!

Part 2 – Remove setting from the Host

Although I probably could have done this first, I was in a hurry and didn’t want to impact production VMs. The process to remove the IO filter from the host is fairly quick and easy, but will require the host to be in maintenance mode, and a reboot is probably useful afterwards.

Put the host into maintenance mode.
SSH into the host.
Run “esxcli software vib list” to view a list of all installed filters.
Run “esxcli software vib remove -n filtername” (replacing filter name) to remove the filter.
While a reboot isnt required, it is suggested.

Infinio Accelerator: Server-Side Caching for Insane Acceleration

Server Side Caching isn’t a totally new concept, but it is a hot market right now as storage providers try and push the speed limits of their perspective platforms. The 3DXPoint water cooler talk is all the craze, even if the product isn’t available to its full potential.

Infinio is a server-side caching solution I have been benchmarking as a potential offering to customers, and I have been very impressed with the quick results. Being able to reduce Read latency (400% in my case) in as little as 15 mins, is what sold me.

Infinio Accelerator is built on three fundamental principles:

  1. The highest performance storage architecture is one where the
    hottest data is co-located with applications in the server
    As storage media has become increasingly faster, culminating in the
    ubiquity of flash devices, the network has become the new bottleneck. An
    architecture that serves I/O server-side provides performance that is
    significantly better than relying on lengthy round-trips to and from even
    the highest performing network-based storage. By serving most I/O with
    server-side speed, as well as reducing demands on centralized arrays,
    Infinio can deliver 10X the IOPS and 20X lower latency of typical storage
    environments.
  2. A “memory-first” architecture is required to realize the best
    storage performance
    RAM is orders of magnitude faster than flash and SSDs, but is price prohibitive
    for most datasets. Infinio’s solution to this problem is a
    content-based architecture, whose inline deduplication enables RAM to
    cache 5X-10X more data than its physical capacity. The option of evicting
    from RAM to a server-side flash tier (which may comprise PCIe flash, SSDs,
    or NVMe devices) offers additional caching capacity. By creating a tiered
    cache such as this, Infinio makes it practical to reduce the storage
    requirements on the server side to just 10% of the dataset. Long-term
    industry trends such as storage-class memory are another indication that a
    memory-first architecture is appropriate for this application.
  3. Delivering storage performance should be 100% headache-free
    Infinio’s software enables the use of server-side RAM and flash to be
    transparent to storage environments, supporting the use of native storage features like snapshots and clones, as well as VMware integrations like
    VAAI and DRS. The introduction of Infinio begins to provide value
    immediately after a non-disruptive, no reboot, 15 minute installation. This
    is in sharp contrast to server-side flash devices used alone, which can
    provide impressive performance results, but require significant
    maintenance and cumbersome data protection.

What does Infinio do exactly?

Infinio Accelerator is a software-based server-side cache that provides high
performance to any storage system in a VMware environment. It increases
IOPS and decreases latency by caching a copy of the hottest data on serverside
resources such as RAM and flash devices. Native inline deduplication
ensures that all local storage resources are used as efficiently as possible,
reducing the cost of performance. Results can be seen instantly following the
non-disruptive, 15-minute installation that doesn’t require any downtime, data
migration, or reboots. 70% of I/O request are Reads (on average), most of your I/O Reads will come directly from super-fast Ram

How does it actually work?

Infinio is built on VMware’s VAIO (vSphere APIs for I/O Filters) framework,
which is the fastest and most secure way to intercept I/O coming from a virtual
machine. Its benefits can be realized on any storage that VMware supports; in
addition, integration with VMware features like DRS, SDRS, VAAI and vMotion
all continue to function the same way once Infinio is installed. Finally, future
storage innovation that VMware releases will be available immediately through
I/O Filter integration.

In short, Infinio is the most cost-effective and easiest way to add storage
performance to a VMware environment. By bringing performance closer to
applications, Infinio delivers:
20X decrease in latency
10X increase in throughput
Reduced storage performance costs ($/IOPS) and capacity costs ($/GB)

Final Thoughts

Honestly, there could not be an easier solution that provides as dramatic results as Server-Side caching. Deploying Ininfio when you are in a performance jam provides immediate relief, and should be part of your performance enhancing arsenal. There is a free trial as well, and remember, there is no downtime to install or uninstall Infinio in your environment.

Please reach out to myself, or your Solution Provider to learn more and test drive Infinio Accelerator. NetWize IT Solutions.

pRDM and vRDM to VMDK Migrations

I was assisting an amazing client in moving some VMs off an older storage array and onto a newer storage platform. They had some VMs that had Physical RDMs (pRDM) attached to the VMs, and we wanted them living as VMDKs on the new SAN.
Traditionally, I have always shutdown the VM, remove the pRDM, re-add with vRDM, and then do the migration, but found an awesome write-up on a few separate ways in doing this.
(Credit of the following content goes to Cormac Hogan of VMware)

VM with Physical (Pass-Thru) RDMs (Powered On – Storage vMotion):

  • If I try to change the format to thin or thick, then no Storage vMotion allowed.
  • If I chose not to do any conversion, only the pRDM mapping file is moved from the source VMFS datastore to the destination VMFS datastore – the data stays on the original LUN.


VM with Virtual (non Pass-Thru) RDMs (Power On – Storage vMotion):

  • On a migrate, if I chose to covert the format in the advanced view, the vRDM is converted to a VMDK on the destination VMFS datastore.
  • If I chose not to do any conversion, only the vRDM mapping file is moved from the source VMFS datastore to the destination VMFS datastore – the data stays on the original LUN (same behaviour as pRDM)


VM with Physical (Pass-Thru) RDMs (Powered Off – Cold Migration):

  • On a migrate, if I chose to change the format (via the advanced view), the pRDM is converted to a VMDKon the destination VMFS datastore.
  • If I chose not to do any conversion, only the pRDM mapping file is moved from the source VMFS datastore to the destination VMFS datastore – the data stays on the original LUN


VM with Virtual (non Pass-Thru) RDMs (Power Off – Cold Migration):

  • On a migrate, if I chose to covert the format in the advanced view, the vRDM is converted to a VMDK on the destination VMFS datastore.
  • If I chose not to do any conversion, only the vRDM mapping file is moved from the source VMFS datastore to the destination VMFS datastore – the data stays on the original LUN (same behaviour as pRDM).

VMware vSphere ISCSI Port Bindings – You’re Probably Doing it Wrong

As a Consultant, I have the opportunity of seeing a lot of different operating environments from a variety of customers. At a high-level, most customers have the same data center infrastructure (Servers, Storage, Running Virtualization, etc). Although the configurations of these environments vary, I see one configuration mistake made by many of these customers – “ISCSI Port Binding”.

For those unfamiliar with ISCSI Port Binding, Port Binding binds/glues the ISCSI Initiator interface on the ESXi Host to a vmknic to allow for ISCSI multipathing. Binding itself technically  doesn’t  “allow multipathing”, just having multiple adapters can do that. But if you have Multiple Adapters/VMkernel ports for ISCSI used in the SAME subnet/broadcast domain, it will allow multiple paths to the ISCSI array that broadcasts one single IP Address.

Why do I need to bind my Initiator to a VMkernel anyway?
When you have multiple ISCSI Adaptors on the same subnet, there is really no control on where data flows or how to control data broadcasts of the adapters. You literally flood that network with rouge packets.
* Note: I am trying to make this easy to understand for those that don’t have a deep technical experience on this subject. And in doing so, I am only telling half-truths here to keep things simple. Don’t call me out on this 🙂

When should you enable ISCSI Port Binding?

ISCSI Port Binding is ONLY used when you have multiple VMKernels on the SAME subnet.

Pictured above, you can see there are multiple VMkernel ports on the same subnet and broadcast domain. You MUST use port binding! If you do not, you may experience the following:
– Unable to see ISCSI Storage on ESXi
– Paths to storage are reported as Dead
– Loss of Path Redundancy Errors
ISCSI Port Binding bypasses some vSwitch Functionality. No Data Path, No Acceleration.
Array Target ports must reside in the same Broadcast Domain & Subnet as the VMkernel port
All VMkernel ports used for ISCSI must reside in the same broadcast domain & subnet
All VMkernel ports used for ISCSI must reside in the same vSwitch

When should you NOT enable ISCSI Port Binding?

Do not enable Port Binding if Array Target ports are in a different broadcast domain & subnet
ISCSI VMkernel ports exist in different broadcast domain, Subnet an/or vSwitch
Routing is required to reach the array
If LACP/Link Aggregation is used on ESXi host uplinks to the pSwitch

In the above example, you should NOT use Port Binding. In doing so, you may experience:
– Rescan times take longer than usual
– Incorrect number of paths per device are seen
– Unable to see any storage from the array

So why do I say you are probably doing it wrong? Most storage arrays use the second example as a best practice for multipathing to the array. Most customers follow those best practices and use two VMkernel Ports on different subnets to connect to their arrays. But most people still enable port binding!
If you are guilty of this, you can easily remove the existing Port Bindings. Doing so will cause a temporary loss to your storage, so make sure all VMs are shutdown, and you have a maintenance window.

Now you know!


Patch an VMware ESXi Host without vCenter

Here is an easy step by step guide, how you can update this ESXi 5 host to the latest version…

1: Start your VMware Hypervisor EXSi 5 like you normal do, and connect to this host with your vSphere Client.

2: Switch the host to maintenance mode.

3: Install the needed patches (they can be found here: http://www.vmware.com/patchmgr/download.portal ) on one of you datastore’s in a folder called patch (in my case the Datastore is called Backup

4: goto the Configuration tab of your host, select Security Profile (under Software in the left) and select the Services Properties in the upper right of your screen

5: Select ESXi Shell and SSH and start these Services with the Start Service command button under Options…
make sure (just as on the screen both services are running(!)

6: Start PuTTY (you can find it here: http://www.chiark.greenend.org.uk/~sgtatham/putty/download.html)

and login as the root to this host…

ow run the command:

esxcli software vib update -d /vmfs/volumes/[Datastorename]/[patchfilename].zip

: be patient(!) this can take some minutes(!) and repeat this for all the patch zip files (make sure you do this in the released order…

8 close puTTY, delete the patch directory from the datastore,  reboot the host. When the host is back, exit the maintenance mode and you are done!

your host is running the latest patches


If you found this article to be helpful, please support us by visiting our sponsors’ websites. 

Install VMware Tools on Linux VMs

Have Linux VMs and need to install VM Tools? Here are super easy instructions.

– First, open the Linux VM in a Console Window
– Click “VM” at the top Window, then “Guest”, followed by “Install/Upgrade VMware Tools”

– In a command line on the linux VM (as root or SU), run the following commands:

install rpm cdrom

Type “1” and hit Enter

After the install, Type “0” and hit Enter

Type “exit”


If you found this article to be helpful, please support us by visiting our sponsors’ websites. 

VMware Update Manager – Setup failed with an unknown error. vCenter credentials could not be validated

I was installing a new VUM (Vmware Update Manager) environment like I have numerous times in the past, and came upon this error I have never seen before.

“Setup failed with an unknown error. vCenter credentials could not be validated.”

While researching the error, I found one solution that has helped some, but did NOT help me.

– “Update Manager does not like passwords with weird characters. Try using a password with letter and numbers only”

So I continued to play around with Update Manager and found a fix for me. I had to give vCenter permissions for the user I was trying to use with Update Manager. To do this, I did the following:

– Login to vsphere using username: administrator@vpshere.local with your SSO Password

– Select the Root vCenter Object and then click on the “Permissions” tab. Right click in the white space and select “Add Permissions”

– Click on “Add” in the left box and search for “Domain Admins” under your domain (As well as any other users you want to give permissions to. Then give Administrator privileges on the right hand side box and click OK.

– Now finish installing Update Manager, using an account you just gave permissions to.

If you found this article to be helpful, please support us by visiting our sponsors’ websites. 

Upgrade vCenter Appliance 5.0/5.1 to 5.5

I have a client that is running vCenter Appliance 5.1 and needs to upgrade to 5.5. I am going to document the process of upgrading their vCenter Appliance to 5.5.

– First, you will need to download a full new version of the vCenter Appliance from VMware’s website. We are going to deploy an entirely new Appliance during this process.

– In vSphere, click “File” and select “Deploy OVF Template.” Select the OVA files you downloaded.

– Name your VM, Select the correct Network and Datastore and click Finish. Let it Deploy

– Set the IP information of the new vCenter server. See my previous post about modifying vCenter Appliance IP here. (The default login is Username: root Password: vmware)

– Connect to both the OLD and the NEW vCenter Appliances in separate browser windows.

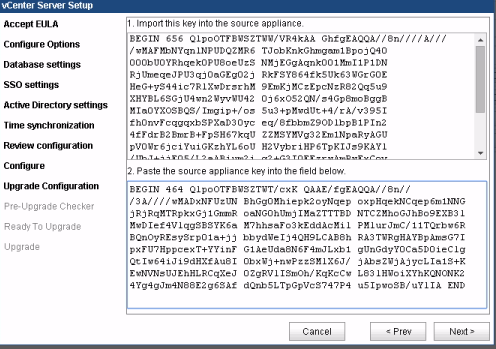
– In the new vCenter Appliance Browser Window, Accept the EULA and select “Upgrade from Previous Version”

– Copy the Key from Box number 1.

– Paste that key into the OLD vCenter Appliance, under the Upgrade tab. Click “Import Key and Stop vCenter Server”

– Copy the Upgrade Key that will be presented and paste that key in Box #2 in the NEW vCenter Server and click Next.

– If there are any issues with certificates, you will need to check the “Replace the SSL Certificates box and then click Next.

– Next, you will be prompted for the SSO password for the user administrator@vpshere.local. This should be “root”

– You should be presented with the ESXi Hosts that will be imported into the new vCenter Appliance. Make sure they are checked, and click Next.

– Review the Upgrade Check and take care of any errors before proceeding

– Click to confirm that you have taken a backup/snapshot of the source vCenter Database and click Start

– When the upgrade completes, click Close. The vCenter Appliance will now reboot and the upgrade is complete.

If you found this article to be helpful, please support us by visiting our sponsors’ websites.