Category Archives: Networking

Factory Reset Aruba IAP Access Point

Reset APs via Console Cable (preferred method)

  • Connect the serial console breakout adapter cable to the AP Ethernet port and a laptop.
  • Power on the AP and get into apboot mode.
  • From the apboot prompt, configure:
    apboot> purge
    apboot> save
    apboot> reset

Reset APs via GUI

  • Click on “Maintenance” and go to the “Convert” tab .
  • In the dropdown for “Convert one or more APs to” choose “Standalone AP”.
  • Pick the one you want. 
  • This will gracefully exit the IAP from the VC cluster.

Sophos XG Virtual Appliance Firewall Deployment – Step by Step Guide

  1. Download the XG Appliance OVF/OVA files from Sophos
  2. In vSphere, Right-Click on the Cluster or Host where you want to deploy the virtual appliance and select Deploy OVF Template

  3. Click Local FileBrowse. Select the .ovf file and the .vmdk disk files and Open

  4. Give the VM a name and select the Datacenter in which to deploy the Virtual Appliance

  5. Select the Host or Cluster in which to deploy the appliance

  6. Review Storage Details

  7. Select the Virtual Network you want assigned to the LAN interface. (You will configure WAN later)

  8. Review Settings and click Finish

  9. Login to the LAN interface using https://172.16.16.16:4444 (make sure your computer or device you are logging in from has an IP on the 172.16.16.0 network. Provide a new Admin password

  10. If your ISP does not provide an IP via DHCP, manually enter the IP parameters.

  11. Review finalized settings and Continue

  12. The firewall will apply configs and reboot a few times. (Takes 5 mins). Login to the firewall at the same https://172.16.16.16:4444 with the new password you yet.

  13. Finally, you can configure the firewall and change LAN IP, etc once logged in.

Sophos XG Firewall Review

Sophos has been climbing the Security leaderboard of the Magic Quadrant for some time now, and we have utilized their amazing Endpoint protection within our company and with our customers. I was excited to get my hands on their XG Firewalls and takes notes of my experience with the initial deployment, configuration, and ongoing feedback.
Note- this review is based off a week or so of usage, and does not incorporate feedback over time, which is where most issues with any product usually creep up.

Aesthetics – Initial impressions of the nuts/bolts

The XG135w is a desktop form factor unit, that has the ability to be rack-mounted (mounting kit not included). It has a nice clean shell, three large omni-directional antennas, with the ability to add two additional antennas with an add-on module. It has 8 x 1GbE ports plus an additional 1GbE SFP port, which when in use, takes the place of Port 5. It has an HDMI port which I haven’t had time to try out, two USB ports and one Micro USB for console access. It feels like they have taken a really nice gaming motherboard and converted it to an awesome firewall. Its rare that you see SFP, HDMI, and Micro USB ports on a firewall, but it’s what makes the XG so unique. The expansion bay allows you to add any one of the following: SFP DSL Module, 3G/4G module, additional Wifi Radio, or additional SFP ports.
The DC power plug threw me off a little bit though, as it is a 12v banana plug that goes into the firewall itself, while the other end requires an adapter to convert it to a US or European power socket. Not a bad thing, but not what you would expect. (There are two DC ports for dual power supplies). 

White Gloss Shell

Banana Plug DC Power


Deployment

Deployment was very easy, with a Setup Wizard that takes you through everything. From Power-On to Management login. It ships with default IP of 172.16.16.16, so you will need to give your laptop an IP on that subnet and then hit that IP through a web browser. You can probably take most of the defaults throughout the 5 page wizard, but the only real decisions you will need to make during setup is a New Admin Password, and whether you want to use the firewall in Route Mode or Bridge Mode. 5 min deployment couldnt be easier.


GUI and Management

Sophos has always been very good at “simplicity of management”, and the Sophos Firewall OS keeps to that style. There are basically four areas of management with the XG-
Monitor and AnalyzeOverview, Alerts, Reports
Protect: Policies, Rules, Security Features
Configure: Network Routing, VPN, etc
System: Device related management

Control Center – Overview


Do not mistake the simplistic design as a lack of features and security granularity. The XG has a LOT of pre-built policy and rule templates, as well as the ability to create your own.

Built-in Web Policies

Application Profiles


Little Gotchas and Thing to Improve

There are a few things that were confusing and more complex than they should be, which I will briefly describe.

Using LAN Ports as Switch Access Ports:
I spent an hour or so at least trying to figure out how to use Ports 3-8 on the same subnet as my LAN traffic. After much trial/error, and even reaching out to Sophos Support, it was finally resolved by a local Sophos SE (Thanks Joe!who has ran into this before. Not only do you have to bridge the interfaces together, you also need to create a LAN to LAN firewall rule allowing the traffic. I guess in hindsight you could say this is just an extra step to maintain security more than it is a software issue, but if so, they should at least document this or train their support staff on how to properly set this up.

Bridge the LAN interfaces then apply the following firewall rule

LAN to LAN Firewall Rule

Default Security Policies:
This could also be considered an extra layer of security, but many multimedia websites/services were semi-broken with the default policies of the XG. For example, NetFlix and Amazon Video would allow you to browse content, but would error out when you attempt to play the content. This also caused some issues in company website hosting services. The solution here was to use the “Allow All” web policy for all Outgoing Traffic. I am sure there is a more granular policy to use here, but with the limited testing I have had with this, that was the quick and dirty fix.


Final Thoughts

I have been VERY happy with what I have seen so far and am excited to continue digging into more. I wish I had another XG to test HA failover, and I would love to test out some of their wireless access points. I didn’t do much Wireless testing with the XG itself, since it usually doesn’t make sense to have the wireless enabled in the data center or server room, but I am very interested to see if their Access Points can replace some of the broader brands. In general, the XG is worthy of replacing most legacy vendors in the data center. The hardware is great, the security features are even better!

Tip to Increase Wifi Speeds on an 802.11ac Network

For the past couple of months, I have been benchmarking many Enterprise Access Points, and have tried to test every possible variable I can think of. During my testing, I found a “trick” that increased my Wifi speeds dramatically. First let me explain…

Most/All Enterprise Access Points (Aruba, Cisco, Meraki, Rukus, etc) use a feature called “Band Steering”, which steers 5Ghz compatible devices to use the 5Ghz channels. I always assumed that if I had a 5Ghz capable laptop, I would always be on a 5Ghz channel. (Conditions permitting). And while that is true, Ive noticed the access points handling my connection in some sort of “5Ghz Compatible” mode. (My made up term).
What I mean by 5Ghz compatible mode, is I am running on the 5Ghz spectrum, and my laptop has an 802.11ac chipset, yet my speeds increase dramatically when I force by laptop to only connect using 802.11a. I guess I assumed I would always connect via 802.11ac if both laptop and AP supported it.

So here it the trick (not really a trick).

  1. Open Network Connections and Right-ClickProperties on your Wifi Adapter

2. Click Configure on the window that appears


3. Click AdvancedWireless Mode – and change value to 802.11a

My average speed increased as follows (transferring 20 MB Files)
Average Upload Time: 13.7% Faster
Average Upload Mbps: 16% Increase
Average Download Time: 52% Faster
Average Download Mbps: 53% Increase

Just remember to switch this back in places that don’t have 802.11ac Wifi or else you may not have a wireless connection at all!

Put SonicWall into Safe Mode

When your SonicWall has gone AWOL or if you have messed something up, there is a pretty easy way to get things back on the right track. Just follow these instructions.

– Unplug the device
– Push a pin the the small hole in the back of the device for 10 seconds (until the red lights flash)
– After, connect to the device via web browser by going to http://192.168.168.168
– Username: admin and Password: password
– From there you can restore from a backup file or start from scratch

If you found this article to be helpful, please support us by visiting our sponsors’ websites. 

Brocade Fibre Channel Zoning

So you want to learn how to zone you fibre channel switches? This post will describe how to do zoning through any Brocade Fibre Channel Switch.

After installing your FC Switch and getting in an IP, Login to it by going to the IP address. It requires a specific version of Java and I have found it works best in Firefox than any other browser.

Once logged into the Switch, you should be presented with the Main Switch Admin page that will look something like this. (Each model varies slightly):

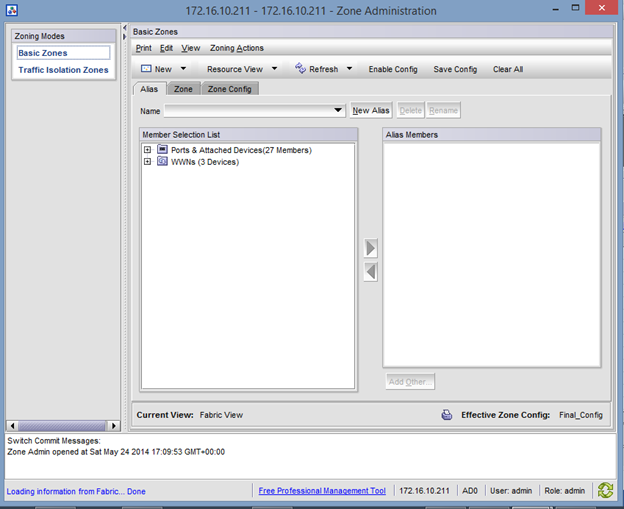
Click Configure at the top of the Screen and Choose “Zone Admin”. A new Window will appear and look like this:

Here is where all the magic happens. In FC Zoning, the goal is to create “VLAN-Like” objects called zones that contain the WWNs of your HBAs and Storage.

First off, lets zone in your SAN. Make sure the only cables plugged into your Fibre Channel Switch, are those from your SAN. (This will make explaining things easier).
We need to create an Alias for the WWNs of your SAN. To do this, I click on the Alias Tab and Select the “New Alias’ Button.

Give your Alias a descriptive name, like SAN_WWNs_ Alias.

Expand the WWN’s on the lefthand side. You’ll want to click the + on the WWNs to view the Second-Level Object. Add those objects to this new Alias you created. (See the image above or below for reference).

After you have the SAN Alias created and have added the WWNs, click on the “ZONE” tab.
Now we will create a new Zone and add the Alias we just created to the zone.
Click the “New Zone” Button and give it a name like “SAN_ WWNs_Zone”.
Expand the Aliases on the left and add the Alias you created to this zone.
If you have a two port FC card, there should only be two WWN’s per switch. Repeat this process on your other switch.

Now for the Servers- We will want to plug the servers in, one at a time, zone each server, and then plug in the next server. This will help us identify which server is which.
When you plug in a server into the FC switch, you will see a new WWN.

You need to go to the Alias Tab and create a new Alias and name is something like: “ServerName”.
Expand the WWN and add the Second-Level WWN object to this Alias.

Next, go to the “ZONE” tab and Create a new zone, something like “Servername+SAN_WWNs”.
Add the Server Alias you created PLUS the “SAN_WWNs_Alias”.
Again, you will add the server Alias and the SAN Alias into this Zone.

Finally, click on the Zone Config Tab and create a new Zone Config. Add all the Zones you created into this Zone Config Tab. This is basically a big file will all your settings.

Click on Save Config at the top and wait about 30 seconds for the changes to be saved. You’ll see a success message in the bottom log screen.
The select Enable Config. Wait another 30 seconds for the settings to be enabled and take effect.

If you found this article to be helpful, please support us by visiting our sponsors’ websites. 

Brocade Fibre Channel Zoning – Dell Compellent

There are good step by step zoning documents out on the internet, so I assume this post will be a success. This post will explain how to do Fibre Channel Zoning using any type of Brocade Fibre Channel Switch. In this case, I am zoning in a Dell Compellent SAN, but these steps basically apply for any type of SAN.

Fibre Channel Zoning for Dell Compellent

After Installing your FC Switch, Login to it by going to the IP address in a web browser. It requires a specific version of Java and I have found it works best in Firefox than any other browser.

Once logged into the Switch, you should be presented with the Main Switch Admin page that will look something like this. (Each model varies slightly):

Click Configure at the top of the Screen and Choose “Zone Admin”. A new Window will appear and look like this:

Here is where all the magic happens. In FC Zoning, the goal is to create “VLAN-Like” objects called zones that contain the WWNs of your Server and Storage HBAs.

Since I am configuring this for a Compellent SAN, the first thing I need to do is create an Alias for all the Physical WWNs. To do this, I click on the Alias Tab and Select the “New Alias” Button.

Give your Alias a descriptive name, like SAN_Phy_WWNs_ Alias.

Expand the WWN’s on the lefthand side. Keep this window on the right side of your screen with the Compellent Storage Center GUI opened on the lefthand side with the Fibre Channel IO cards expanded so you can see their WWNs.

Add all the Physical WWNs you see in the switch that match up with the Physical WWNs on the Compellent SAN. (Physical WWNs on Compellent are the Green objects).
If you have a two port card, you will only see two Physical WWN’s (Per switch).
After you have added the two Physical WWNs to this alias you created, you will need to do this exact same thing on your other switch, only this time you will use the OTHER Compellent Physical WWNs you see in the list.

When finished, create a new alias and call is something like “SAN_Virt_WWNs_Alias”.
This time you will follow the same steps as above but you will be adding the Virtual WWNs of the Compellent into this alias. The Virtual WWNs are the ones in blue. Again, if you have a two port FC card, there should only be two WWN’s PER SWITCH. Repeat this process on your other switch for the other Virtual WWNs.

Next we create two Zones. One Zone that includes the Alias of the Physical WWNs and one zone that contains the Alias of the Virtual WWNs. TO do this, click on the Zone tab and select new Zone.

Name the Zones something like “SAN_Virt_WWNs” and “SAN_Phys_WWNs”.
In one zone add JUST the “SAN_Virtual_WWN_Alias” Alias, and in a new Zone and JUST “SAN_Phys_WWNs_Alias”

Now for the Servers- When you plug in a server into the FC switch, you will see a new WWN.

You need to go to the Alias Tab and create a new Alias and name is something like: “ServerName”.
Expand the WWN and add the Second-Level WWN object to this Alias.

Next, go to the Zone tab and Create a new zone, something like “Servername+SAN_WWNs”.
Add the Server Alias you created PLUS the “SAN_Virtual_WWNs” Alias.
You will need to make sure each Server you connect to the SAN has It’s server alias + The SAN’s Virtual WWN’s. 

Finally, click on the Zone Config Tab and create a new Zone Config. Add all the Zones you created into this Zone Config Tab. This is basically a big file will all your settings.

Click on Save Config at the top and wait about 30 seconds for the changes to be saved. You’ll see a success message in the bottom log screen.
The select Enable Config. Wait another 30 seconds for the settings to be enabled and take effect.


To recap, these are the aliases and zones you will need to create:

Compellent_Phy_WWNs: Alias
Compellent_Virt_WWNs: Alias

Compellent_Phy_Alias: Zone
Compellent_Virt_Alias: Zone

ServerWWN+Compellent_Virt_WWN: Zone

Add all those to your zone config.

If you found this article to be helpful, please support us by visiting our sponsors’ websites. 

What it’s like to be a Network Engineer, Translated End-User Language

User: I think we are having a major road issue.

Me: What? No, I just checked, the roads are fine. I was actually just on the roads.

User: No I’m pretty sure the roads are down because I’m not getting Pizzas.

Me: Everything else on the roads is fine. What do you mean you aren’t getting Pizzas.

User: I used to get Pizzas when I ordered them, now I’m not getting them. It has to be a road issue.

Me: As I said, the roads are fine. Where are you getting pizzas from?

User:…I’m not really sure. Can you check all places that deliver pizzas?

Me: No I’m not even sure all the places that deliver pizza. You need to narrow it down.

User: I think it’s Subway.

Me: Ok I’ll check…No I just looked and Subway doesn’t deliver pizzas.

User: I’m pretty sure it is Subway. Can you just allow all food from Subway and we can see if Pizza shows up?

Me: Sigh, fine I’ve allowed all food from Subway, but I don’t think that is the issue.

User: Yeah I’m still not getting pizza. Can you check the roads?

Me: It’s not the roads, the roads are fine. I’m pretty sure Subway isn’t the place.

User: Ok I found it, its Papa Johns.

Me: Ok I looked and Papa Johns does deliver pizza. Is it the local papa johns or one in a different town?

User: I don’t know. Can you allow pizza from all Papa Johns to me?

Me: No I can’t do that. Can you get me an address for Papa Johns?

User: No, I only know it as Papa Johns. Can you get me all the addresses of all Papa Johns and I’ll tell you if one of them is correct?

Me: No I don’t have time for that. Ok I looked at the local one and it looks like they have sent you pizza in the past and they are currently allowed to send you pizzas. Try ordering a pizza while I watch.

User: Yeah still no pizza. I’m guessing they are getting blocked at the freeway. Can you check the freeway to make sure they can get through?

Me: NO this is a local delivery. They aren’t even using the freeway.

User: Ok, well then it has to be a road issue.

Me: NO the roads are fine. OK I just drove from the papa johns to the address they have on file for you and there is nothing there.

User: Hmm, wait we did move recently.

Me: Did you give your new address to Papa johns?

User: no, I just thought they would be able to look me up by name.

Me: No they need your new address. What’s your new address?

User: I’m not really sure. Can you look it up?

Me: sigh, give me a second…Ok I found your address and gave it to Papa Johns. Try ordering a pizza now.

User: HEY PIZZA JUST SHOWED UP!

Me: Ok, good.

User to everyone else they know: I apologize for the delay in the pizza but there was a major road issue that was preventing the pizza from getting to me. The network engineer has fixed the roads and we are able to get pizza again.

Me: but it wasn’t the roads…whatever.

User: oh can you also check on an issue where Chinese food isn’t getting to me? I think it may be a road issue.

If you found this article to be helpful, please support us by visiting our sponsors’ websites.