Tag Archives: upgrade

Upgrade to SQL 2019 Express for Veeam Backup

Veeam has been shipping with SQL 2012 which is end of life, and newer patches of Veeam does not upgrade SQL during the patching process. It is on the end-user to upgrade their instance of SQL, which is pretty easy to do.

Before you Upgrade

You will want to do a few things before you start the upgrade process:
– Disabled all Veeam jobs in Veeam
– Stop and Disable all Veeam Services on Windows, making sure you notate the original Startup state (Automatic vs Automatic Delayed Start).
– If Veeam is running on a VM, please snapshot the VM
– Backup the databases manually using SQL Studio

On to the Upgrade Process

  1. Download SQL 2019 Express from Microsoft. The download links always seem to change, so you will need to snag a copy yourself.
  2. Run the executable and select Custom as the Installation Type.
  3. Choose a location to save the files that will be downloaded for the install. The default path is fine.
  4. When the Installation Center window appears, choose Upgrade from a Previous Version of SQL Server.

5. Choose the SQL instance you would like to upgrade. For a reference of which build numbers equal which version of SQL, see this Microsoft Doc here:


6. The installation will then start.


I ran into an issue where SQL Upgrade was looking for a Microsoft OLE DB Driver from source installation. I tried to download this driver from Microsoft and point the installer there, but that did not work.

To remedy this, I uninstalled this driver, rebooted the server, and restarted the installation, and it upgraded the Database Engine Services which failed the first time, but was successful now.

Verify Upgrade Success

You can view the upgrade build status by opening the database in SQL Studio Manager and going to properties of the instance. Refer to the version build numbers link I posted earlier in this post.

You can also view this info by going to properties of the SQL service, and reference the path to the executable.

Post Upgrade

Now that the upgrade is complete, enable the Veeam services and Veeam jobs.

Veeam One Issue

After the upgrade, Veeam Backup worked great, but I noticed I could not get into Veeam One, and would receive the following error: “Veeam One monitoring service cannot access its database

This was resolved by opening the Veeam One Settings application (C:\Program Files\Common Files\Veeam\Veeam ONE Settings\VeeamOneSettings.exe) and testing the connection. All the settings looked good, but it would fail the connection test. I clicked Browse by Server Name and selected the server again, and this time it tested successfully and I could use Veeam One again.

Update Plex – FreeNAS 11.3

The path to the iocage jails has changed in FreeNAS 11.3. This post shows the new path, but the instructions are the exact same as they were on FreeNAS 11.2.

  1. Download the newest Plex Update via Plex Dashboard Link
  2. Extract the file twice so folders can be accessed
  3. Rename folder plexmediaserver
    For Plex Pass Subscribers, rename plexmediaserver-plexpass
This image has an empty alt attribute; its file name is image.png
This image has an empty alt attribute; its file name is image-1.png
This image has an empty alt attribute; its file name is image-2.png

4. Stop the current Plex Jail
5. Open WinSCP and login to FreeNAS and browse to: /mnt/FreeNAS/iocage/jails/plexpass/root/usr/local/share
6. Rename existing plexmediaserver folder and add _old at the end
7. Copy the plexmediaserver folder you downloaded into the WinSCP window

This image has an empty alt attribute; its file name is image-9.png
This image has an empty alt attribute; its file name is image-3.png

8. Right-Click on the copied folder and set permissions recursively to 0775
9. Open the plexmediaserver folder and select the file Plex Media Server
10. Click New Link

11. Name the link Plex_Media_Server and click OK
12. Click the Link you created and select the Console Button
13. Enter the command: chmod -h 775 Plex_Media_Server

This image has an empty alt attribute; its file name is image-7.png
This image has an empty alt attribute; its file name is image-8.png

Upgrade Complete!

Update Plex – FreeNAS iocage

Manual Plex Upgrade

  1. Download the newest Plex Update via Plex Dashboard Link
  2. Extract the file twice so folders can be accessed
  3. Rename folder plexmediaserver
    For Plex Pass Subscribers, rename plexmediaserver-plexpass

4. Stop the current Plex Jail
5. Open WinSCP and login to FreeNAS and browse to /mnt/iocage/jails/root/usr/local/share/
6. Rename existing plexmediaserver folder and add _old at the end
7. Copy the plexmediaserver folder you downloaded into the WinSCP window

8. Right-Click on the copied folder and set permissions recursively to 0775
9. Open the plexmediaserver folder and select the file Plex Media Server
10. Click New Link

11. Name the link Plex_Media_Server and click OK
12. Click the Link you created and select the Console Button
13. Enter the command: chmod -h 775 Plex_Media_Server

Upgrade Complete!

Upgrade vCenter Appliance 5.0/5.1 to 5.5

I have a client that is running vCenter Appliance 5.1 and needs to upgrade to 5.5. I am going to document the process of upgrading their vCenter Appliance to 5.5.

– First, you will need to download a full new version of the vCenter Appliance from VMware’s website. We are going to deploy an entirely new Appliance during this process.

– In vSphere, click “File” and select “Deploy OVF Template.” Select the OVA files you downloaded.

– Name your VM, Select the correct Network and Datastore and click Finish. Let it Deploy

– Set the IP information of the new vCenter server. See my previous post about modifying vCenter Appliance IP here. (The default login is Username: root Password: vmware)

– Connect to both the OLD and the NEW vCenter Appliances in separate browser windows.

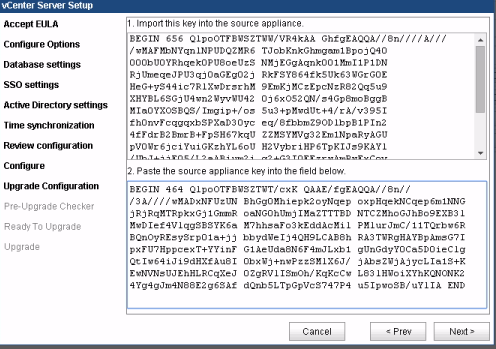
– In the new vCenter Appliance Browser Window, Accept the EULA and select “Upgrade from Previous Version”

– Copy the Key from Box number 1.

– Paste that key into the OLD vCenter Appliance, under the Upgrade tab. Click “Import Key and Stop vCenter Server”

– Copy the Upgrade Key that will be presented and paste that key in Box #2 in the NEW vCenter Server and click Next.

– If there are any issues with certificates, you will need to check the “Replace the SSL Certificates box and then click Next.

– Next, you will be prompted for the SSO password for the user administrator@vpshere.local. This should be “root”

– You should be presented with the ESXi Hosts that will be imported into the new vCenter Appliance. Make sure they are checked, and click Next.

– Review the Upgrade Check and take care of any errors before proceeding

– Click to confirm that you have taken a backup/snapshot of the source vCenter Database and click Start

– When the upgrade completes, click Close. The vCenter Appliance will now reboot and the upgrade is complete.

If you found this article to be helpful, please support us by visiting our sponsors’ websites.