Tag Archives: vSphere

Manually Remove I/O Filters From vSphere VM

I was attempting to move a VM from one host to another, and received the fallowing error: “Host does not support the virtual hardware configuration of virtual machine. The IO Filters(s) XXXX configured on the VM’s disk are not installed on the destination host.

At one point, I was using a VM accelerator solution that was not cleanly removed. It took me awhile to figure out how to remove the IO filter from the VM, so hopefully this guide will save you some time.

Part 1 – Remove setting from the VM

After searching the config files of the VM, I came across the VM’s VMDK descriptor file. This is not the storage VMDK file itself, but the 1KB sized descriptor file which I had to edit.

There are two lines that contain configurations for the IO filter, and both need to be removed. These are the ddb.iofilters and ddb.sidecars settings. Both lines can just be removed and the file saved.

Upon trying to migrate the VM after removing these lines, I received the same error as before. I needed to make the host aware of these changes somehow. This was achieved by right-clicking the VM –> VM Policies –> Edit VM Storage Policies..

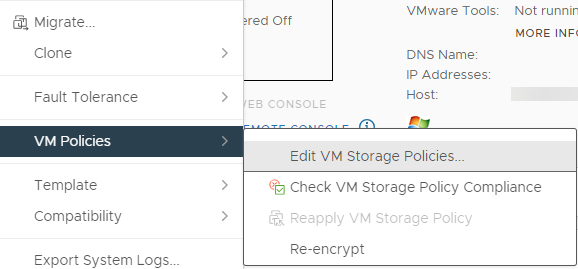
I didn’t have to change anything, but just needed to click OK.

After doing those tasks, I was able to successfully migrate the VM!

Part 2 – Remove setting from the Host

Although I probably could have done this first, I was in a hurry and didn’t want to impact production VMs. The process to remove the IO filter from the host is fairly quick and easy, but will require the host to be in maintenance mode, and a reboot is probably useful afterwards.

Put the host into maintenance mode.
SSH into the host.
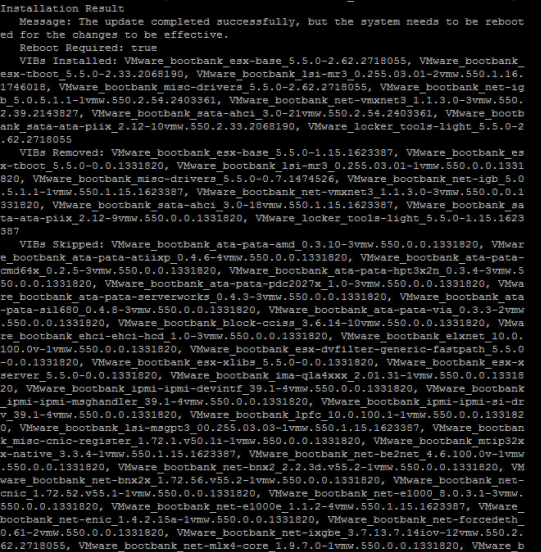
Run “esxcli software vib list” to view a list of all installed filters.
Run “esxcli software vib remove -n filtername” (replacing filter name) to remove the filter.
While a reboot isnt required, it is suggested.

Enable Copy and Paste in the vSphere Client Console

One of the most annoying things about the vSphere Thick Client, is the fact that you cannot copy and paste things between your local computer and the VM by default. I know that VMware is pushing us to use the Web Client, but let’s face it, 95% of their customers are still using the Windows Client that they have become accustomed to.
For those customers, this one’s for you!

In order to enable Copy and Paste through the console, you will need add a custom config to EACH VM. (This is not a global setting).

  1. Edit the Settings of a VM using vSphere Thick or Web Client
  2. Select the Options > Advanced > General > Configuration Parameters
  3. Click Add Row for each of the following settings

    Name: isolation.tools.copy.disable 
    Value: false

    Name: isolation.tools.paste.disable
    Value: false

  4. Click OK and reboot VM (or if set while VM is off, boot VM)

vSphere HTML5 Web Client is available… Kind of

VMware has released the vSphere Web Client in HTML5 flavor as a “Fling”. Not all web client features are available through the fling yet, but it’s just a preview into their progression in getting away from Flash, something they probably should have done in vSphere 5 and definitely should have done at vSphere 6 launch in my opinion. You can access the fling here.

https://labs.vmware.com/flings/vsphere-html5-web-client

Queue the Angels rejoicing soundtrack in the background-

Patch and Update VMware ESXi via SSH CLI

Most clients using VMware patch and update their vSphere Hosts using VMware Update Manager or VUM. This provides an easy GUI to find needed updates and apply them to your ESXi Hosts. Once in awhile, VUM has issues patching hosts. And to use VUM, you need a valid licensed vCenter. So those of you using the Free ESXi or need to patch hosts not registered to your vCenter, the easiest way to patch your hosts is through the SSH Command Line (CLI). I will run this process down, step by step.

– Login to your free MyVmware.com account and download the latest patches
http://www.vmware.com/patchmgr/download.portal

– In the portal, select the ESXi (embedded and installable), and select your version of ESXi you need to patch. Then download the latest update. The patches are cumulative, so the latest update will include all previous patches as well.

– Shutdown your VMs using the Windows vSphere Client and put the host into maintenance mode.

– Enable SSH on the host by selecting the host in the vSphere Client, clicking on Configuration, Security Profile, and click Properties in the top right hand corner. Open SSH and click the Start button.

– Using the vSphere Client, browse to a local Datastore and upload the downloaded patch to the root of the Datastore, (or a folder of your choosing).

– Using Putty or some other SSH tool, type in the IP address of your host, and login with the “root” user.

– Now on to patching the host. Type the following command, replacing this example path with the patch of where you uploaded the patch (in zip format).

esxcli software vib update -d /vmfs/volumes/<your_datastore>/<name_of_the_patch_you_uploaded.zip

– Wait a few minutes, after which you should see a bunch of text showing the status of the update.

– Finally, type “reboot” and you should be all updated after the reboot!


VMware vSphere ISCSI Port Bindings – You’re Probably Doing it Wrong

As a Consultant, I have the opportunity of seeing a lot of different operating environments from a variety of customers. At a high-level, most customers have the same data center infrastructure (Servers, Storage, Running Virtualization, etc). Although the configurations of these environments vary, I see one configuration mistake made by many of these customers – “ISCSI Port Binding”.

For those unfamiliar with ISCSI Port Binding, Port Binding binds/glues the ISCSI Initiator interface on the ESXi Host to a vmknic to allow for ISCSI multipathing. Binding itself technically  doesn’t  “allow multipathing”, just having multiple adapters can do that. But if you have Multiple Adapters/VMkernel ports for ISCSI used in the SAME subnet/broadcast domain, it will allow multiple paths to the ISCSI array that broadcasts one single IP Address.

Why do I need to bind my Initiator to a VMkernel anyway?
When you have multiple ISCSI Adaptors on the same subnet, there is really no control on where data flows or how to control data broadcasts of the adapters. You literally flood that network with rouge packets.
* Note: I am trying to make this easy to understand for those that don’t have a deep technical experience on this subject. And in doing so, I am only telling half-truths here to keep things simple. Don’t call me out on this 🙂

When should you enable ISCSI Port Binding?

ISCSI Port Binding is ONLY used when you have multiple VMKernels on the SAME subnet.

Pictured above, you can see there are multiple VMkernel ports on the same subnet and broadcast domain. You MUST use port binding! If you do not, you may experience the following:
– Unable to see ISCSI Storage on ESXi
– Paths to storage are reported as Dead
– Loss of Path Redundancy Errors
ISCSI Port Binding bypasses some vSwitch Functionality. No Data Path, No Acceleration.
Array Target ports must reside in the same Broadcast Domain & Subnet as the VMkernel port
All VMkernel ports used for ISCSI must reside in the same broadcast domain & subnet
All VMkernel ports used for ISCSI must reside in the same vSwitch

When should you NOT enable ISCSI Port Binding?

Do not enable Port Binding if Array Target ports are in a different broadcast domain & subnet
ISCSI VMkernel ports exist in different broadcast domain, Subnet an/or vSwitch
Routing is required to reach the array
If LACP/Link Aggregation is used on ESXi host uplinks to the pSwitch

In the above example, you should NOT use Port Binding. In doing so, you may experience:
– Rescan times take longer than usual
– Incorrect number of paths per device are seen
– Unable to see any storage from the array

So why do I say you are probably doing it wrong? Most storage arrays use the second example as a best practice for multipathing to the array. Most customers follow those best practices and use two VMkernel Ports on different subnets to connect to their arrays. But most people still enable port binding!
If you are guilty of this, you can easily remove the existing Port Bindings. Doing so will cause a temporary loss to your storage, so make sure all VMs are shutdown, and you have a maintenance window.

Now you know!


Reset vCenter Appliance Root Password

If you have lost your root password to the vCenter Appliance, OR, if you had password expirations on the root account and the password is expired, here is a way to reset the password and regain access to vCenter.

  1. Reboot the vCSA using the vSphere Client.
  2. When the GRUB bootloader appears, press the spacebar to disable autoboot.
  3. Type p to access the appliance boot options.
  4. Enter the GRUB password
    Note:

    • If the vCSA was deployed without editing the root password in the Virtual Appliance Management Interface (VAMI), the default GRUB password is vmware.
    • If the vCSA root password was reset using the VAMI, then the GRUB password is the password last set in the VAMI for the root account.
  5. Use the arrow keys to highlight VMware vCenter Server Appliance and type e to edit the boot commands.
  6. Scroll to the second line displaying the kernel boot parameters.
  7. Type e to edit the boot command.
  8. Append init=/bin/bash to the kernel boot options.
  9. Press Enter. The GRUB menu reappears.
  10. Type b to start the boot process. The system boots to a shell.
  11. Reset the root password by running the “passwd root” command.
  12. Restart the appliance by running the reboot command.

Additional Information

The vCSA allows you to establish your own password expiration and warning email policies by using the Admin tab of the Virtual Appliance Management Interface (VAMI).
By default, the password expiration on the local root account in the vCSA is set to 90 days after the password has been changed. This typically occurs at first boot. If the password is not changed on installation, there is a 90-day period before expiration.Email addresses configured in the Admin tab in the VAMI (https://IP_address:5480 or https://VAMI_host_name:5480) receive email notifications each day for seven days prior to password expiration. The email settings, such as relay SMTP server, are configured through the vSphere Client in the vCenter Server mail settings.

If you found this article to be helpful, please support us by visiting our sponsors’ websites. 

Patch an VMware ESXi Host without vCenter

Here is an easy step by step guide, how you can update this ESXi 5 host to the latest version…

1: Start your VMware Hypervisor EXSi 5 like you normal do, and connect to this host with your vSphere Client.

2: Switch the host to maintenance mode.

3: Install the needed patches (they can be found here: http://www.vmware.com/patchmgr/download.portal ) on one of you datastore’s in a folder called patch (in my case the Datastore is called Backup

4: goto the Configuration tab of your host, select Security Profile (under Software in the left) and select the Services Properties in the upper right of your screen

5: Select ESXi Shell and SSH and start these Services with the Start Service command button under Options…
make sure (just as on the screen both services are running(!)

6: Start PuTTY (you can find it here: http://www.chiark.greenend.org.uk/~sgtatham/putty/download.html)

and login as the root to this host…

ow run the command:

esxcli software vib update -d /vmfs/volumes/[Datastorename]/[patchfilename].zip

: be patient(!) this can take some minutes(!) and repeat this for all the patch zip files (make sure you do this in the released order…

8 close puTTY, delete the patch directory from the datastore,  reboot the host. When the host is back, exit the maintenance mode and you are done!

your host is running the latest patches


If you found this article to be helpful, please support us by visiting our sponsors’ websites.