Category Archives: VMware

vSphere 5.5 Client and Windows Server 2003 Error

You may have noticed that since upgrading to vSphere 5.5, the vSphere client gives you this error when trying to login from a Windows 2003 Server:

An unknown connection error occurred. (The Client could not send a complete request to the server. (The underlying connection was closed: An unexpected error occurred on a send.”

This is a known issue and is caused by a lack of SSL ciphers on Server 2003 (and Windows XP). There is a fix, however, it only works on 64 bit versions of Server 2003. You can download the hotfix from Microsoft here:
http://support.microsoft.com/kb/948963

Reset vCenter Appliance Root Password

If you have lost your root password to the vCenter Appliance, OR, if you had password expirations on the root account and the password is expired, here is a way to reset the password and regain access to vCenter.

  1. Reboot the vCSA using the vSphere Client.
  2. When the GRUB bootloader appears, press the spacebar to disable autoboot.
  3. Type p to access the appliance boot options.
  4. Enter the GRUB password
    Note:

    • If the vCSA was deployed without editing the root password in the Virtual Appliance Management Interface (VAMI), the default GRUB password is vmware.
    • If the vCSA root password was reset using the VAMI, then the GRUB password is the password last set in the VAMI for the root account.
  5. Use the arrow keys to highlight VMware vCenter Server Appliance and type e to edit the boot commands.
  6. Scroll to the second line displaying the kernel boot parameters.
  7. Type e to edit the boot command.
  8. Append init=/bin/bash to the kernel boot options.
  9. Press Enter. The GRUB menu reappears.
  10. Type b to start the boot process. The system boots to a shell.
  11. Reset the root password by running the “passwd root” command.
  12. Restart the appliance by running the reboot command.

Additional Information

The vCSA allows you to establish your own password expiration and warning email policies by using the Admin tab of the Virtual Appliance Management Interface (VAMI).
By default, the password expiration on the local root account in the vCSA is set to 90 days after the password has been changed. This typically occurs at first boot. If the password is not changed on installation, there is a 90-day period before expiration.Email addresses configured in the Admin tab in the VAMI (https://IP_address:5480 or https://VAMI_host_name:5480) receive email notifications each day for seven days prior to password expiration. The email settings, such as relay SMTP server, are configured through the vSphere Client in the vCenter Server mail settings.

If you found this article to be helpful, please support us by visiting our sponsors’ websites. 

Patch an VMware ESXi Host without vCenter

Here is an easy step by step guide, how you can update this ESXi 5 host to the latest version…

1: Start your VMware Hypervisor EXSi 5 like you normal do, and connect to this host with your vSphere Client.

2: Switch the host to maintenance mode.

3: Install the needed patches (they can be found here: http://www.vmware.com/patchmgr/download.portal ) on one of you datastore’s in a folder called patch (in my case the Datastore is called Backup

4: goto the Configuration tab of your host, select Security Profile (under Software in the left) and select the Services Properties in the upper right of your screen

5: Select ESXi Shell and SSH and start these Services with the Start Service command button under Options…
make sure (just as on the screen both services are running(!)

6: Start PuTTY (you can find it here: http://www.chiark.greenend.org.uk/~sgtatham/putty/download.html)

and login as the root to this host…

ow run the command:

esxcli software vib update -d /vmfs/volumes/[Datastorename]/[patchfilename].zip

: be patient(!) this can take some minutes(!) and repeat this for all the patch zip files (make sure you do this in the released order…

8 close puTTY, delete the patch directory from the datastore,  reboot the host. When the host is back, exit the maintenance mode and you are done!

your host is running the latest patches


If you found this article to be helpful, please support us by visiting our sponsors’ websites. 

Install VMware Tools on Linux VMs

Have Linux VMs and need to install VM Tools? Here are super easy instructions.

– First, open the Linux VM in a Console Window
– Click “VM” at the top Window, then “Guest”, followed by “Install/Upgrade VMware Tools”

– In a command line on the linux VM (as root or SU), run the following commands:

install rpm cdrom

Type “1” and hit Enter

After the install, Type “0” and hit Enter

Type “exit”


If you found this article to be helpful, please support us by visiting our sponsors’ websites. 

VMware Update Manager – Setup failed with an unknown error. vCenter credentials could not be validated

I was installing a new VUM (Vmware Update Manager) environment like I have numerous times in the past, and came upon this error I have never seen before.

“Setup failed with an unknown error. vCenter credentials could not be validated.”

While researching the error, I found one solution that has helped some, but did NOT help me.

– “Update Manager does not like passwords with weird characters. Try using a password with letter and numbers only”

So I continued to play around with Update Manager and found a fix for me. I had to give vCenter permissions for the user I was trying to use with Update Manager. To do this, I did the following:

– Login to vsphere using username: administrator@vpshere.local with your SSO Password

– Select the Root vCenter Object and then click on the “Permissions” tab. Right click in the white space and select “Add Permissions”

– Click on “Add” in the left box and search for “Domain Admins” under your domain (As well as any other users you want to give permissions to. Then give Administrator privileges on the right hand side box and click OK.

– Now finish installing Update Manager, using an account you just gave permissions to.

If you found this article to be helpful, please support us by visiting our sponsors’ websites. 

Upgrade vCenter Appliance 5.0/5.1 to 5.5

I have a client that is running vCenter Appliance 5.1 and needs to upgrade to 5.5. I am going to document the process of upgrading their vCenter Appliance to 5.5.

– First, you will need to download a full new version of the vCenter Appliance from VMware’s website. We are going to deploy an entirely new Appliance during this process.

– In vSphere, click “File” and select “Deploy OVF Template.” Select the OVA files you downloaded.

– Name your VM, Select the correct Network and Datastore and click Finish. Let it Deploy

– Set the IP information of the new vCenter server. See my previous post about modifying vCenter Appliance IP here. (The default login is Username: root Password: vmware)

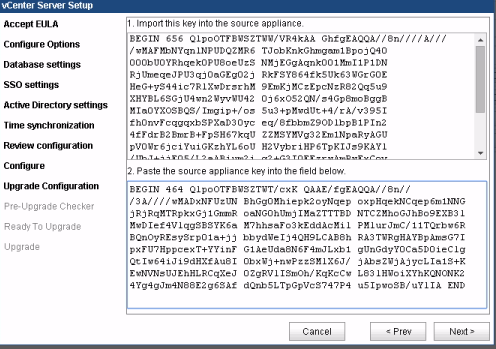
– Connect to both the OLD and the NEW vCenter Appliances in separate browser windows.

– In the new vCenter Appliance Browser Window, Accept the EULA and select “Upgrade from Previous Version”

– Copy the Key from Box number 1.

– Paste that key into the OLD vCenter Appliance, under the Upgrade tab. Click “Import Key and Stop vCenter Server”

– Copy the Upgrade Key that will be presented and paste that key in Box #2 in the NEW vCenter Server and click Next.

– If there are any issues with certificates, you will need to check the “Replace the SSL Certificates box and then click Next.

– Next, you will be prompted for the SSO password for the user administrator@vpshere.local. This should be “root”

– You should be presented with the ESXi Hosts that will be imported into the new vCenter Appliance. Make sure they are checked, and click Next.

– Review the Upgrade Check and take care of any errors before proceeding

– Click to confirm that you have taken a backup/snapshot of the source vCenter Database and click Start

– When the upgrade completes, click Close. The vCenter Appliance will now reboot and the upgrade is complete.

If you found this article to be helpful, please support us by visiting our sponsors’ websites. 

The vSphere Web Client cannot connect to the vCenter Single Sign On server

I was trying to login to my vSphere Web Client the other day, and saw this error:
“The vSphere Web Client cannot connect to the vCenter Single Sign On server”

I Googled around and didn’t really find a suitable answer for me. I was able to resolve it by resetting the following services on my vCenter server:
– VMware vSphere Web Client
– VMware Directory Service

I had to wait a bit and refresh the webpage, but was able to get back in. Hope this helps someone.

If you found this article to be helpful, please support us by visiting our sponsors’ websites. 

The vSphere Web Client cannot connect to the vCenter Single Sign On server Error

I was trying to login to my vSphere Web Client and got this error:

Googling the fix didn’t come up with any resolutions, but I found a fix by remoting into my vCenter Server, and restarting the “VMware vSphere Web Client” Service”

That was it! After a restart, I was able to login!

If you found this article to be helpful, please support us by visiting our sponsors’ websites. 

View your VMware ESXi Host’s System Log, Config and Datastore via a Web Browser

Looking for an easy way to view your VMware ESXi host’s System LogsConfig Files andDatastore?  This rather nifty ESXi feature will save you the hassle of having to log onto the ESXi console to view any of these items.  All you simply have to do is open a web browser and enter in one of the two URLs (see below) – depending on what you’re wanting to access.  Keep in mind that what is displayed in the web browser is read-only.

ESXi Configuration Files & System Logs:


http://<insert ESXi host name or IP here>/host


Click on any of the displayed items to view their contents.

ESXi Datastores:

To view the ESXi host’s attached datastores and the total and consumed disk space enter:


http://<insert ESXi host name or IP here>/folder

If you found this article to be helpful, please support us by visiting our sponsors’ websites.