Author Archives: admin

VMware Update Manager (VUM) Repositories – HP, Dell, IBM, Lenovo

VMware’s Update Manager is a pretty convenient tool that allows you to patch your ESXi hosts with the latest security, feature, drivers and bug patches. By default, VMware Update Manager downloads these patches from its own repository, but sometimes (usually) doesn’t have the latest drivers and patches for host servers from their actual manufactures (Dell, HP, Cisco, IBM). Most these vendors offer a repository that VUM can use to download drivers from those manufactures. Here is how you do it.

Assuming you have Update Manager installed, in the Windows vSphere Client (Web Client can’t use VUM yet)
1. Go to the “Home” screen.
2. Toward the bottom of the screen, click “Update Manager

3. Then click on “Configuration” on the Top Tab
4. “Download Settings” on the left side,
5. And finally, click “Add Download Source” above the repository window.

Here you can add URL’s that the manufactures have provided to download the latest drivers and patches. VMware Update Manager will periodically check for new updates from these URLs, and download them automatically. Not every manufacture provides this feature, but here are the ones I could find.

HPE Repository 1
HPE Repository 2
HP Management Tools
Dell
Brocade 1
Brocade 2
Lenovo

Change VMware vCenter Appliance’s Default Password, or Else…

For those running VMware’s vCenter appliance (if not, it should be something to consider in vSphere 6), you may run into an issue where you cannot authenticate using the default appliance credentials.
Username: root
Password: vmware

You have 90 days to change this password or else you will see this error when trying to login to the appliance:

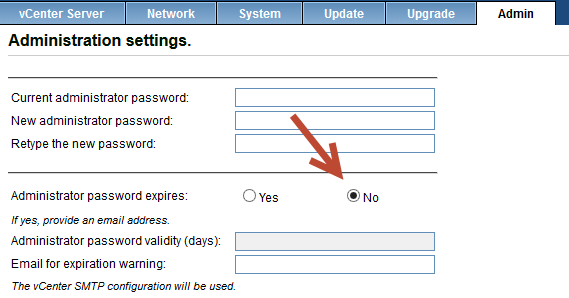
As a note: Once you have changed the default password, you can choose to have your new password NOT expire. This is done in the appliance web portal- https://applianceIP:5480

For those that are facing this issue, there is a solution! (Besides blowing the VM away and starting from scratch). This can be done using some commands, but needs to be done from a “LIVE CD”. A Live CD is a bootable ISO (or actual CD) you can download and boot into. This allows you to run a temporary environment that has access to the actual installed OS.  Any Linux Live CD will do, but I prefer Kali Linux or Ubuntu. You will need “console” access to your vCenter appliance, which you can access from the vSphere Web Client. Just connect to the actual host where your Appliance VM resides.

– Mount the Live CD to the VCenter Appliance VM and boot into the ISO/CD.

– Next, bring up a Terminal or Shell and enable root user:

su -

– Then we need to mount the vCenter Virtual Appliance’s root parition

mount /dev/sda3 /mnt

– We need to /mnt/etc/shadow file to disable the account lock. Use the Vi editor to make the edit.

vi /mnt/etc/shadow

*When the root password is expired there should be an x in front of the password string.

– Delete the “x” character in front of the password string. (The password string is the text after “root:“. Then save the changes in Vi editor (ZZ is the Vi Editor SAVE command, then quit with :q command).

– Unmount the LiveCD and reboot the vCenter Appliance VM. Now you should be able to login with the default/last root password you had set.

– If you don’t want the password to expire, you can login to the appliance (now that the password has been enabled), click on the “Admin” tab, and check the box to NOT expire the password

Patch and Update VMware ESXi via SSH CLI

Most clients using VMware patch and update their vSphere Hosts using VMware Update Manager or VUM. This provides an easy GUI to find needed updates and apply them to your ESXi Hosts. Once in awhile, VUM has issues patching hosts. And to use VUM, you need a valid licensed vCenter. So those of you using the Free ESXi or need to patch hosts not registered to your vCenter, the easiest way to patch your hosts is through the SSH Command Line (CLI). I will run this process down, step by step.

– Login to your free MyVmware.com account and download the latest patches
http://www.vmware.com/patchmgr/download.portal

– In the portal, select the ESXi (embedded and installable), and select your version of ESXi you need to patch. Then download the latest update. The patches are cumulative, so the latest update will include all previous patches as well.

– Shutdown your VMs using the Windows vSphere Client and put the host into maintenance mode.

– Enable SSH on the host by selecting the host in the vSphere Client, clicking on Configuration, Security Profile, and click Properties in the top right hand corner. Open SSH and click the Start button.

– Using the vSphere Client, browse to a local Datastore and upload the downloaded patch to the root of the Datastore, (or a folder of your choosing).

– Using Putty or some other SSH tool, type in the IP address of your host, and login with the “root” user.

– Now on to patching the host. Type the following command, replacing this example path with the patch of where you uploaded the patch (in zip format).

esxcli software vib update -d /vmfs/volumes/<your_datastore>/<name_of_the_patch_you_uploaded.zip

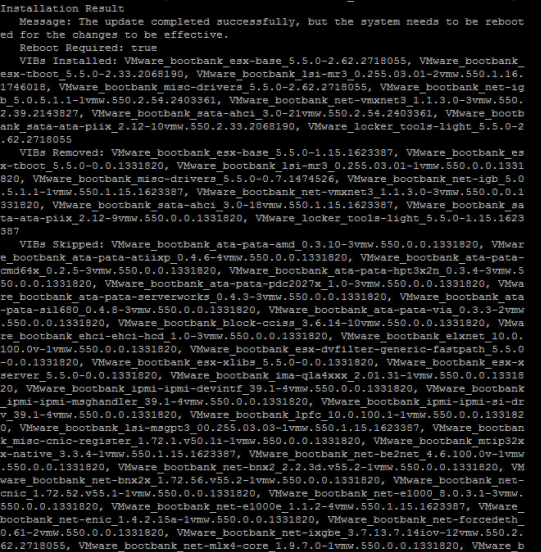
– Wait a few minutes, after which you should see a bunch of text showing the status of the update.

– Finally, type “reboot” and you should be all updated after the reboot!


Running Dell DPACK longer than 24hrs

If you have ever used the DELL DPACK utility to analyze your storage, you’ll find that the application only gives you the ability to scan for 24hrs. Dell does this because they claim “statistically” the DPACK results don’t vary much from any particular day to day. Having run hundreds and hundreds of DPACK scans for many customers, I find that more often than not, the results from various days of running are different enough to warrant longer monitoring times. My advice is to run your DPACK for 3-4 days. And here is how you do it

First download the DPACK tool from http://dell.com/dpack
Extract the Software
Open a Command Prompt and change directory to the extracted DPACK folder
Run the following command: dellpack.exe /extended
CMD_Prompt__BLUR2_.png

Now you should be able to change the monitoring duration:
Time_Duration.png

VMware vSphere ISCSI Port Bindings – You’re Probably Doing it Wrong

As a Consultant, I have the opportunity of seeing a lot of different operating environments from a variety of customers. At a high-level, most customers have the same data center infrastructure (Servers, Storage, Running Virtualization, etc). Although the configurations of these environments vary, I see one configuration mistake made by many of these customers – “ISCSI Port Binding”.

For those unfamiliar with ISCSI Port Binding, Port Binding binds/glues the ISCSI Initiator interface on the ESXi Host to a vmknic to allow for ISCSI multipathing. Binding itself technically  doesn’t  “allow multipathing”, just having multiple adapters can do that. But if you have Multiple Adapters/VMkernel ports for ISCSI used in the SAME subnet/broadcast domain, it will allow multiple paths to the ISCSI array that broadcasts one single IP Address.

Why do I need to bind my Initiator to a VMkernel anyway?
When you have multiple ISCSI Adaptors on the same subnet, there is really no control on where data flows or how to control data broadcasts of the adapters. You literally flood that network with rouge packets.
* Note: I am trying to make this easy to understand for those that don’t have a deep technical experience on this subject. And in doing so, I am only telling half-truths here to keep things simple. Don’t call me out on this 🙂

When should you enable ISCSI Port Binding?

ISCSI Port Binding is ONLY used when you have multiple VMKernels on the SAME subnet.

Pictured above, you can see there are multiple VMkernel ports on the same subnet and broadcast domain. You MUST use port binding! If you do not, you may experience the following:
– Unable to see ISCSI Storage on ESXi
– Paths to storage are reported as Dead
– Loss of Path Redundancy Errors
ISCSI Port Binding bypasses some vSwitch Functionality. No Data Path, No Acceleration.
Array Target ports must reside in the same Broadcast Domain & Subnet as the VMkernel port
All VMkernel ports used for ISCSI must reside in the same broadcast domain & subnet
All VMkernel ports used for ISCSI must reside in the same vSwitch

When should you NOT enable ISCSI Port Binding?

Do not enable Port Binding if Array Target ports are in a different broadcast domain & subnet
ISCSI VMkernel ports exist in different broadcast domain, Subnet an/or vSwitch
Routing is required to reach the array
If LACP/Link Aggregation is used on ESXi host uplinks to the pSwitch

In the above example, you should NOT use Port Binding. In doing so, you may experience:
– Rescan times take longer than usual
– Incorrect number of paths per device are seen
– Unable to see any storage from the array

So why do I say you are probably doing it wrong? Most storage arrays use the second example as a best practice for multipathing to the array. Most customers follow those best practices and use two VMkernel Ports on different subnets to connect to their arrays. But most people still enable port binding!
If you are guilty of this, you can easily remove the existing Port Bindings. Doing so will cause a temporary loss to your storage, so make sure all VMs are shutdown, and you have a maintenance window.

Now you know!


Edit VMware 5.5 Virtual Machines without Web Client

VMware was pretty sneaky about its last Virtual Hardware update (vmx-10) in the vSphere 5.5 release. After updating your Virtual Machines, you could no longer edit the VM’s settings using the vSphere Client.


You were forced to use the Web Client to edit settings, but the Web Client isn’t available to standalone hosts. It is only available for environments with a licensed vCenter. (Test/Dev environments were out of luck). I assume after the frustrated customer uprising that took place on web forums, VMware has finally given us a solution. Customers just need to upgrade their vSphere Client to 5.5u2.
https://my.vmware.com/web/vmware/info/slug/datacenter_cloud_infrastructure/vmware_vsphere/5_5

One thing to mention though, they still have stripped customers of taking full advantage of editing their VM Settings. You are only able to edit hardware version 9 and 10 VMs, but only on the feature level of hardware version 8. (For real?)

Here are the list of properties that are editable

      • Increase RAM
    • Decrease RAM
    • Change network port group
    • Remove devices
    • Increase vCPU
    • Decrease vCPU
    • Mount ISO
    • Increase disk space
    • Set a limit
    • Remove a limit
    • Set a reservation
    • Remove a reservation
    • Edit advanced settings

VMware Consumed Host Memory vs Active Guest Memory

I get asked frequently, what is the difference between the Consumed Host Memory of a VM (shown in the VM Resources), and the Active Guest Memory. This explanation is technical, but answers the question correctly.

Consumed Host Memory usage is defined as the amount of host memory that is allocated to the virtual machine.

Active Guest Memory is defined as the amount of guest memory that is currently being used by the guest operating system and its applications.


But here is the technical aspect of it all:

1) Why is consumed host memory usage higher than active guest memory?

“The hypervisor knows when to allocate host physical memory for a virtual machine because the first memory access from the virtual machine to a host physical memory will cause a page fault that can be easily captured by the hypervisor. However, it is difficult for the hypervisor to know when to free host physical memory upon virtual machine memory deallocation because the guest operating system free list is generally not publicly accessible. Hence, the hypervisor cannot easily find out the location of the free list and monitor its changes.”

So the host allocates memory pages upon their first request from the guest (that’s why consumed is less than the configured maximum), but doesn’t deallocate them once they are freed in the guest OS (because the host simply doesn’t see those guest deallocations). If the guest OS re-uses such previously allocated pages, the host won’t allocate more host memory. If the guest OS however allocates different pages, the host will also allocate more memory (up to the point where all configured memory pages for the specific guest have been allocated).

 2) How is active guest memory calculated? 

“At the beginning of each sampling period, the hypervisor intentionally invalidates several randomly selected guest physical pages and starts to monitor the guest accesses to them. At the end of the sampling period, the fraction of actively used memory can be estimated as the fraction of the invalidated pages that are re-accessed by the guest during the epoch”.

In other words, the active guest memory is calculated from outside the guest by an approximation on the hypervisor level.

vSphere 5.5 Client and Windows Server 2003 Error

You may have noticed that since upgrading to vSphere 5.5, the vSphere client gives you this error when trying to login from a Windows 2003 Server:

An unknown connection error occurred. (The Client could not send a complete request to the server. (The underlying connection was closed: An unexpected error occurred on a send.”

This is a known issue and is caused by a lack of SSL ciphers on Server 2003 (and Windows XP). There is a fix, however, it only works on 64 bit versions of Server 2003. You can download the hotfix from Microsoft here:
http://support.microsoft.com/kb/948963

Put SonicWall into Safe Mode

When your SonicWall has gone AWOL or if you have messed something up, there is a pretty easy way to get things back on the right track. Just follow these instructions.

– Unplug the device
– Push a pin the the small hole in the back of the device for 10 seconds (until the red lights flash)
– After, connect to the device via web browser by going to http://192.168.168.168
– Username: admin and Password: password
– From there you can restore from a backup file or start from scratch

If you found this article to be helpful, please support us by visiting our sponsors’ websites.