Category Archives: VMware

Create Bootable VMware ESXi Installer USB Drive

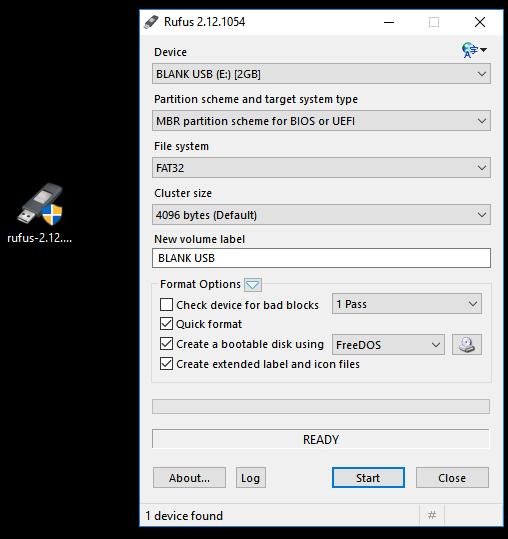
Getting ESXi installed on a server today is more often done through the servers BMC (iLO, iDRAC, CMC, etc). But this guide might be helpful when installing vSphere on a standalone server. The tool of choice for any bootable USB is my friend Rufus.

There are three things you will need to do this:

  • Download Rufus Here
  • Download whatever .iSO image you want to be bootable (whether its WIndows, ESXi, or Linux).
  • Use a somewhat quality USB Flash Drive (1GB or larger). For some reason, I will run into some cheap-o thumb drives that do not boot anything. If your boot drive doesn’t work, try a different flash drive


Here are the easy steps:

  • Insert your blank (or soon to be formatted) flash drive into your PC
  • Open Rufus

  • Under Device, select the flash drive you wish to format and use
  • Select MBR partition Scheme for BIOS or UEFI
  • Filesystem = Fat32
  • Use default Cluster Size (4096 bytes)
  • Click the icon next to FreeDOS and select your ISO image
  • Rename the New Volume Label to whatever you wish to see when you insert the flash drive into a PC
  • Click Start

  • When prompted to replace menu.c32, select Yes

  • Finally, click Yes to the warning that this flash drive will be formatted (destroyed)


That’s it. It will take a couple of mins, but you should have a bootable flash drive.

System logs are stored on non-persistent storage

As customer start to deploy ESXi on smaller SD Cards or Boot from SAN, they encounter the following error after installing a new host:

“System logs are stored on non-persistent storage”

This error just indicates that you need to save your scratch logs to another location, (shared storage or local disk). The process is super easy. To change the location, use on of the following methods:

Verifying the Location of System Logs in vSphere Client

To verify the location:

  1. In vSphere Client, select the host in the inventory panel.
  2. Click the Configuration tab, then click Advanced Settings under Software.
  3. Ensure that Syslog.global.logDir points to a persistent location.The directory should be specified as [datastorename] path_to_file where the path is relative to the datastore. For example, [datastore1] /systemlogs.
  4. If the Syslog.global.logDir field is empty or explicitly points to a scratch partition, make sure that the field ScratchConfig.CurrentScratchLocation shows a location on persistent storage.

Verifying the Location of System Logs in vSphere Web Client

To verify the location:

  1. Browse to the host in the vSphere Web Client navigator.
  2. Click the Manage tab, then click Settings.
  3. Under System, click Advanced System Settings.
  4. Ensure that Syslog.global.logDir points to a persistent location.
  5. If the field Syslog.global.logDir is empty or points to a scratch partition, make sure that the field ScratchConfig.CurrentScratchLocation shows a location on persistent storage.

No image profile is found on the host or image profile is empty. An image profile is required to install or remove VIBs. To install an image profile, use the esxcli image profile install command

While upgrade an ESXi 6 host for a customer last night, I ran into the following error when trying to patch via Update Manager:
No image profile is found on the host or image profile is empty. An image profile is required to install or remove VIBs. To install an image profile, use the esxcli image profile install command.”

I tried various things such as rebooting the host, and manually patching via esxcli. (See my previous post on patching via CLI) but nothing seemed to work.

The server was a Dell R620, and after some searching, I found that it had a corrupt profile image. This can be fixed by replacing the corrupt image file and replacing with a known good one from another host. (The hosts dont have to be the same server version, but I would try to keep to same CPU families (Intel vs AMD). Here is how to do it.

  1. On the working ESXi host, copy the following image file: imgdb.tgz
    cp /bootbank/imgdb.tgz /vmfs/volumes/<An Accessible LUN>

  2.  On the corrupt host, copy the file imgdb.tgz from the working host to /tmp:
    cp /vmfs/volumes/<An Accessible LUN>/imgdb.tgz /tmp

  3. Change Directories to /tmp
    cd /tmp

  4. Extract file you just copied
    tar -xzf imgdb.tgz

  5. Copy the working profile files to the profile directory
    cp /tmp/var/db/esximg/profiles/* /var/db/esximg/profiles/

  6. Copy the working VIBs to the VIB repository
    cp /tmp/var/db/esximg/vibs/* /var/db/esximg/vibs/

  7. Remove the corrupt imgdb.tgz from the bootbank
    rm /bootbank/imgdb.tgz

  8. Move the working copy of imgdb.tgz into the bootbank
    cp /tmp/imgdb.tgz /bootbank/

  9. Make Config Backup
    /sbin/auto-backup.sh

  10. Reboot the host
    reboot
  11. Update host using Update Manager again

VMware vMotion Error: The Operation is not Supported on the Object

While trying to vMotion (Host and Storage), I kept getting the following error:
“The operation is not supported on this object”.

I noticed their switches were negotiating the vMotion NICs at 100/mb, which is unsupported by VMware. After messing with the customer’s switch, I was able to set those ports to 1000-full. But after doing so, I was still getting this error, and nobody online had a solution. After messing with it for 45 mins, I was able to resolve this by disabling vMotion on the NIC, and then re-enabling it. I assume the vMotion setting needed to be reset now that the NICs were set to 1000/mb.

Hope this helps

ESXi “Error loading /k.b00” “Fatal error: 33 (Inconsistent Data)

I was deploying ESXi 6 on a new server, booting off USB thumb-drive where I put the ESXi installer. (Installer creatred with Rufus), I got the following error just a few seconds into the install

Error loading /k.b00
Compressed MD5: 23a1XXXXXXXXXX
Decompressed MD5: 00000000000000000000000000
Fatal error: 33 (Inconsistent data)

Turned out to be a bad USB drive.
Bad (usually cheap generic drives) work well for storing files, but in my experience, lack the ability to be used as install media or “Live CD’s”. I am not sure what makes one drive work over the other, but assume it has to do with the controller interface on those drives.

Enable Copy and Paste in the vSphere Client Console

One of the most annoying things about the vSphere Thick Client, is the fact that you cannot copy and paste things between your local computer and the VM by default. I know that VMware is pushing us to use the Web Client, but let’s face it, 95% of their customers are still using the Windows Client that they have become accustomed to.
For those customers, this one’s for you!

In order to enable Copy and Paste through the console, you will need add a custom config to EACH VM. (This is not a global setting).

  1. Edit the Settings of a VM using vSphere Thick or Web Client
  2. Select the Options > Advanced > General > Configuration Parameters
  3. Click Add Row for each of the following settings

    Name: isolation.tools.copy.disable 
    Value: false

    Name: isolation.tools.paste.disable
    Value: false

  4. Click OK and reboot VM (or if set while VM is off, boot VM)

VMware Horizon View Error: SSL Session Negotiation Failed or The Zero Client may not be compatible with the host session negotiation cipher settings.

I just did a Horizon View Upgrade from 5.2 to Horizon 7 for a large customer who uses Zero Clients for every employee. The customer is using Dell Wise P25 Zero Clients for most employees, but still have the older P20 for a select few. Both the P20 and P25 uses chipsets from Teradici, but the firmware on each is slightly different.
After the upgrade, employees using the older P20 Zero Clients would get the following error when trying to connect to their View session:

SSL Session Negotiation Failed or The Zero Client may not be compatible with the host session negotiation cipher settings.

After much research, I found a few KBs and Posts with the apparent “fix”, but none of them worked as they claimed – at least not in this environment. After spending many hours trying to resolve this, I found a solution that worked for this client. I hope this helps someone else.

This issue affects Horizon View 6.2 and 7.0. The root cause of this is due to VMware disabling support for the less secure TLS 1.0 protocol. The P25 Zero Clients need the latest 4.8 Firmware, which addresses the problem, but the P20 Zero Client’s only support firmware up to 4.5, which does not address this issue, so a workaround is needed. After following some blogs about importing a Group Policy, I found it to be a waste of time.  So here is what actually works.

On each virtual desktop (or gold image), you’ll need to add the following Registry Key:

HKLM\Software\Teradici\PCoIP\pcoip_admin
Name: pcoip.ssl_protocol
Type: REG_SZ
Value: TLS1.0:TLS1.1:TLS1.2

Or download and import this .reg file I created with these settings: Regedit File Download
This allows TLS 1.0 connections via the installed agent.

On the Connection Server, edit the Connection Server Settings and uncheck Secure Tunnel
View Configuration – Servers – Connection Servers – Edit

This will allow connections to Authenticate through the Connection Server and then connect directly to the Virtual Desktop.

This fixed the issue for the customer until they can replace their older Zero Clients.


Deploy vSphere HTML5 Web Client

My last post had a link to a VMware Fling for the HTML5 Web Client for vSphere, but I thought I would follow-up with a step-by-step guide on deploying it (since it is an appliance). These guides seem to get the most traffic, so I assume they are the most helpful. Here we go.

First lets grab the HTML5 Appliance .OVA file and we will also need a .bat file (assuming you are using vCenter on Windows). You can grab those here.

Always use the regular Web Client to deploy and configure your VMs. More and more features are being removed from the thick client. If you try to deploy this appliance using the thick client, you will need to setup and IP pool. (This is not required if you are using the web client).
vSphere HTML5 Web Client IP Pools

Appliance Deployment

Through the existing Web Client, deploy a new OVF Template. Select the downloaded .ova file, accept the agreements, choose your storage, networks, and deploy.


Configure vSphere HTML5 appliance with vCenter for Windows

  1. Open Command Prompt as Administrator and Run the “Server-Configure.bat” script we downloaded from VMware’s fling page earlier on the Windows server where vCenter is installed. This must be ran as Administrator, and must be run from Command Prompt, and not just RIght-Clicked and Ran from Explorer
    (The script assumes vCenter was installed using the default path. If it was not, you will need to modify the script).

  2. SSH into the HTML5 appliance (username = root , password = demova) and create the following directories for the config files.
    –  mkdir /etc/vmware/vsphere-client/
    –  mkdir /etc/vmware/vsphere-client/config/
    –  mkdir /etc/vmware/vsphere-client/vsphere-client/

  3. Using WinSCP or another file transfer method, copy the generated files from the “Server-Configure.bat” script to the directories we just created on the appliance. See below:
    –   /etc/vmware/vsphere-client/store.jks
    –  /etc/vmware/vsphere-client/config/ds.properties
    –  /etc/vmware/vsphere-client/vsphere-client/webclient.properties

  4. Keeping time sync between the HTML5 Web Client and vCenter is critical. You should add an NTP entry to the appliance. This can be done by going to https://appliance_ip:5480 and login with rootdemova , or add an NTP server via CLI in the appliance:
    –  /etc/init.d/vsphere-client configure ntp_servers <IP address of NTP Server(s)>
    vSphere HTML5 Web Client Windows Fig 7

  5. Start the Web Client services
    –  /etc/init.d/vsphere-client start

Now you can use the HTML5 Web Client by hitting its URL at https://IP_of_appliance:9443/ui

vSphere HTML5 Web Client is available… Kind of

VMware has released the vSphere Web Client in HTML5 flavor as a “Fling”. Not all web client features are available through the fling yet, but it’s just a preview into their progression in getting away from Flash, something they probably should have done in vSphere 5 and definitely should have done at vSphere 6 launch in my opinion. You can access the fling here.

https://labs.vmware.com/flings/vsphere-html5-web-client

Queue the Angels rejoicing soundtrack in the background-

vROps – Monitor Windows Processes and Resources with Guest VM

I recently ran a hands-on-lab with my fellow IT Peers on vRealize Operations Manager, and one of the (many) items I did not cover but was asked about, was if vROps had the ability to “peer” into the guest VM itself and monitor and manage resources and processes. I told users I would send a whitepaper to the group on this, but thought a post might illustrate it better.

VMware uses the Hyperic Monitoring agent and is able to hook it right into the VM, Windows or Linux. The first step is to head over to myvmware.com and download the EndPoint Agents for vRealize Operations Manager and Run as Administrator (always best practice)

Enter vROps Server Address

Now we need the Certificate Thumbprint of the vROps server. (Doesn’t matter if its registered or self-signed). To get this, in a browser, go to
http://[your-FQDN-vROps]/admin
and login

Click the cert icon in top right-hand corner

Copy the thumbprint

Note: Unless you replaced the original certificate with a custom certificate, the second thumbprint in the list is the correct one. If you did upload a custom certificate, the first thumbprint in the list is the correct one.

Now paste that thumbprint in the installer window

Login with local vROps credentials

Take defaults and install.


After the install, it may take 5-10 mins before the EP agent checks in with vROps, but when it does, you should be able to see it under
EnvironmentOperating SystemsOperating Systems WorldWindows