System logs are stored on non-persistent storage

As customer start to deploy ESXi on smaller SD Cards or Boot from SAN, they encounter the following error after installing a new host:

“System logs are stored on non-persistent storage”

This error just indicates that you need to save your scratch logs to another location, (shared storage or local disk). The process is super easy. To change the location, use on of the following methods:

Verifying the Location of System Logs in vSphere Client

To verify the location:

  1. In vSphere Client, select the host in the inventory panel.
  2. Click the Configuration tab, then click Advanced Settings under Software.
  3. Ensure that Syslog.global.logDir points to a persistent location.The directory should be specified as [datastorename] path_to_file where the path is relative to the datastore. For example, [datastore1] /systemlogs.
  4. If the Syslog.global.logDir field is empty or explicitly points to a scratch partition, make sure that the field ScratchConfig.CurrentScratchLocation shows a location on persistent storage.

Verifying the Location of System Logs in vSphere Web Client

To verify the location:

  1. Browse to the host in the vSphere Web Client navigator.
  2. Click the Manage tab, then click Settings.
  3. Under System, click Advanced System Settings.
  4. Ensure that Syslog.global.logDir points to a persistent location.
  5. If the field Syslog.global.logDir is empty or points to a scratch partition, make sure that the field ScratchConfig.CurrentScratchLocation shows a location on persistent storage.

No image profile is found on the host or image profile is empty. An image profile is required to install or remove VIBs. To install an image profile, use the esxcli image profile install command

While upgrade an ESXi 6 host for a customer last night, I ran into the following error when trying to patch via Update Manager:
No image profile is found on the host or image profile is empty. An image profile is required to install or remove VIBs. To install an image profile, use the esxcli image profile install command.”

I tried various things such as rebooting the host, and manually patching via esxcli. (See my previous post on patching via CLI) but nothing seemed to work.

The server was a Dell R620, and after some searching, I found that it had a corrupt profile image. This can be fixed by replacing the corrupt image file and replacing with a known good one from another host. (The hosts dont have to be the same server version, but I would try to keep to same CPU families (Intel vs AMD). Here is how to do it.

  1. On the working ESXi host, copy the following image file: imgdb.tgz
    cp /bootbank/imgdb.tgz /vmfs/volumes/<An Accessible LUN>

  2.  On the corrupt host, copy the file imgdb.tgz from the working host to /tmp:
    cp /vmfs/volumes/<An Accessible LUN>/imgdb.tgz /tmp

  3. Change Directories to /tmp
    cd /tmp

  4. Extract file you just copied
    tar -xzf imgdb.tgz

  5. Copy the working profile files to the profile directory
    cp /tmp/var/db/esximg/profiles/* /var/db/esximg/profiles/

  6. Copy the working VIBs to the VIB repository
    cp /tmp/var/db/esximg/vibs/* /var/db/esximg/vibs/

  7. Remove the corrupt imgdb.tgz from the bootbank
    rm /bootbank/imgdb.tgz

  8. Move the working copy of imgdb.tgz into the bootbank
    cp /tmp/imgdb.tgz /bootbank/

  9. Make Config Backup
    /sbin/auto-backup.sh

  10. Reboot the host
    reboot
  11. Update host using Update Manager again

Uninstall Annoying Windows 10 Stock Apps via Powershell

These apps come with Windows 10, and some you can Right-Click and Uninstall, while others you cannot. That that you are able to Right-Click and uninstall, seem to come back with every Windows Updates you install (because Right-Click Uninstall doesn’t uninstall them completely).
So the easiest way to do this is with our favorite enemy friend, Powershell!

  1. First thing is to open Powershell as Administrator

All stock apps are in the AppxPackage command set. So running something like Get-AppxPackage would show you currently installed stock apps.

2. Here is the list of package commands that can be used to remove all or specific components

Remove all stock apps from all user accounts
Get-AppxPackage -allusers | Remove-AppxPackage

Remove all modern apps from system account
Get-AppxProvisionedPackage -online | Remove-AppxProvisionedPackage -online


Skype: Get-AppxPackage *skype* | Remove-AppxPackage
Sway: Get-AppxPackage *sway* | Remove-AppxPackage
Phone: Get-AppxPackage *commsphone* | Remove-AppxPackage
Phone Companion: Get-AppxPackage *windowsphone* | Remove-AppxPackage
Phone and Phone Compantion Apps: Get-AppxPackage *phone* | Remove-AppxPackage
Calendar, Mail: Get-AppxPackage *communicationsapps* | Remove-AppxPackage
People: Get-AppxPackage *people* | Remove-AppxPackage
Groove Music: Get-AppxPackage *zunemusic* | Remove-AppxPackage
Movies and TV: Get-AppxPackage *zunevideo* | Remove-AppxPackage
Groove Music/Movies/TV: Get-AppxPackage *zune* | Remove-AppxPackage
Money: Get-AppxPackage *bingfinance* | Remove-AppxPackage
News: Get-AppxPackage *bingnews* | Remove-AppxPackage
Sports: Get-AppxPackage *bingsports* | Remove-AppxPackage
Weather: Get-AppxPackage *bingweather* | Remove-AppxPackage
Money, News, Sports, Weather: Get-AppxPackage *bing* | Remove-AppxPackage
OneNote: Get-AppxPackage *onenote* | Remove-AppxPackage
Alarms and Clock: Get-AppxPackage *alarms* | Remove-AppxPackage
Calculator: Get-AppxPackage *calculator* | Remove-AppxPackage
Camera: Get-AppxPackage *camera* | Remove-AppxPackage
Voice Recorder: Get-AppxPackage *soundrecorder | Remove-AppxPackage
Maps: Get-AppxPackage *maps* | Remove-AppxPackage
3D Builder: Get-AppxPackage *3dbuilder* | Remove-AppxPackage
Xbox: Get-AppxPackage *xbox* | Remove-AppxPackage
Solitaire: Get-AppxPackage *solitaire* | Remove-AppxPackage
Get Office: Get-AppxPackage *officehub* | Remove-AppxPackage
Get Skype: Get-AppxPackage *SkypeApp* | Remove-AppxPackage
Get Started: Get-AppxPackage *Getstarted* | Remove-AppxPackage
Windows Store: Get-AppxPackage *windowsstore* | Remove-AppxPackage

Tip to Increase Wifi Speeds on an 802.11ac Network

For the past couple of months, I have been benchmarking many Enterprise Access Points, and have tried to test every possible variable I can think of. During my testing, I found a “trick” that increased my Wifi speeds dramatically. First let me explain…

Most/All Enterprise Access Points (Aruba, Cisco, Meraki, Rukus, etc) use a feature called “Band Steering”, which steers 5Ghz compatible devices to use the 5Ghz channels. I always assumed that if I had a 5Ghz capable laptop, I would always be on a 5Ghz channel. (Conditions permitting). And while that is true, Ive noticed the access points handling my connection in some sort of “5Ghz Compatible” mode. (My made up term).
What I mean by 5Ghz compatible mode, is I am running on the 5Ghz spectrum, and my laptop has an 802.11ac chipset, yet my speeds increase dramatically when I force by laptop to only connect using 802.11a. I guess I assumed I would always connect via 802.11ac if both laptop and AP supported it.

So here it the trick (not really a trick).

  1. Open Network Connections and Right-ClickProperties on your Wifi Adapter

2. Click Configure on the window that appears


3. Click AdvancedWireless Mode – and change value to 802.11a

My average speed increased as follows (transferring 20 MB Files)
Average Upload Time: 13.7% Faster
Average Upload Mbps: 16% Increase
Average Download Time: 52% Faster
Average Download Mbps: 53% Increase

Just remember to switch this back in places that don’t have 802.11ac Wifi or else you may not have a wireless connection at all!

VMware Storage I/O Control (SIOC) – A Blessing and a Curse

I am taking this content straight from an email I just sent a customer, so the content isn’t well polished. But the email took me long enough to write that I decided to post it here for others.

Storage I/O Control (SIOC) is a mechanism to prevent one VM to hog all the I/O resources making the other VMs wait for their I/O request to be completed. By default, it gives every VM on a Datastore fair and Equal I/O Shares. It is able to gauge and determine fairness based off latency. So if you have two VMs (VM1 and VM2) and VM1’s latency hits a specified threshold (30ms is default), then it will actually SLOW VM2’s I/O access and give the scheduler resources back to VM1 until fair sharing is equalized again. This is different than QoS, but I’m sure you see some similarities.

So that sounds great, right? (Really, it is great). But this is not very effective and can be detrimental in certain circumstances. I’ll try to explain.

First let me preface this by explaining two concepts, which  you may already be aware of.

  1. Hypervisors work via scheduled process. Every VM waits its turn to receive the CPU Cycle or Memory Page it requested until it is his turn in the scheduler.
  2. Every Volume you create and map to a host is given a LUN ID (this volume is the LUN) and each LUN has access to schedulers. All the VMs in this Volume/LUN take their turn for I/O requests. This is why best practice dictates you put a maximum of 10-15 VMs per Volume, or much less if those are resource intensive VMs. The more VMs in the LUN, the longer each VM has to wait for its I/O requests. (Note- Setting resource shares doesn’t solve this, it just guarantees one VM will have priority over another)

There are certain scenarios where SIOC can possibly make things worse. The scenario you might be running into is the following:
You have a SAN capable of tiered storage, which is really amazing when you think about how that all works. What’s even more incredible is that you are able to have different RAID types be striped across the same physical disk. (Hot data lives on 15k drives in a RAID 10 stripe, and as I becomes warm, it moves into a RAID 5 stripe across those same physical 15k drives).

Lets take our VM1 and VM2, both reside on the same LUN. We have enabled SIOC on that LUN. VM1 is a high resource VM that is crucial to your business and VM2 is just a Test/Dev Server. Most of VM1’s blocks reside in your 15k disks RAID10, but a few of its less hot blocks have moved to RAID 5, but still on those 15k drives. Again, data on VM1 is almost always hot.
VM2 on the other hand, has some of its blocks on the 15k drive, and some reside on the 7k slower drives since that data is hardly ever accessed.

One day you log into VM2, and fires up an application who’s data is on those 7k drives. That data takes longer to retrieve, naturally, since its sitting on the slowest media, and the time it takes to queue up and process that I/O request (latency) is much greater than the time its taking VM1 to process its requests.

What happens is the SIOC’s mechanism kicks in and because the latency on retrieving data for VM2 is impeding on its “fair access” functionality. So it throttles down the I/O of VM1 (your production server) to try and decrease the latency VM2 is having. You have essentially killed the performance of the VM that needs it the most. Now imagine this happening for all your VMs, VMDKs, bits, blocks, whatever you want to include, it has become a traffic nightmare. It can throttle a VM down so much, waiting for the latency to decrease on the other VMs, that everything is timing out, whereas if you weren’t using SIOC, things would be humming along as usual, and VM2 will just take its sweet time processing data from the slow drives.

I am sure you were aware of most of these concepts, and what I have described is somewhat over-simplified, but hopefully that makes sense. Sharing workloads across the same physical drives can make SICO a nightmare. If you are careful in what workloads you place in what LUN, then SIOC can be great, even on tiered storage. If you take an old EMC or Netapp where you used to carve out specific disks for specific volumes, SIOC would also be great.

Dell Compellent’s Best Practice is to use this with caution, just as other have stated as well on this feature.


Copy GPO Policies to Notepad for faster discovery and editing

I had a customer that had well over 40 GPO polices with 500+ changes settings altogether. I had to parse through them all and doing so in Notepad++ was so much easier. Here is how you do it.

This example is for the default domain policy:

  1. Open Group Policy Management (GPMC).
  2. Select your GPO. You can choose a GPO link or the GPO itself.

  3. Choose the Settings Tab and click Show all

  4. Right Click anywhere and Select All
    The Right Click and Copy Selection (or use Ctrl-C)

  5. Paste that copied data into Wordpad or preferably Notepad++

  6. Click search at the top and then replace:
    Replace hide$ with nothing in Regular Expression mode and click Replace All.

    There you have it. Easy to read and find what you need!

Dell Storage Manager (DSM) Deployment

Dell Compellent’s Enterprise Manager is growing up and has been rebranded Dell Storage Manager, since it can now manager SC and PS storage. DSM is available as a VMware Appliance, and that is what we will use to deploy DSM.

First things first – You’ll need to get the download link from CoPilot, as it is not publicly available in Knowledge Center.

Once you have the DSMVirtualAppliance-16.xxxx.zip file, extract it and deploy the OVF file as you would any other appliance in VMware.

Once deployed and running, you have a few options:
1- Download the Client, Admin Guide, etc (Do this by going to https://appliance_IP)
2- Run the Setup (https://appliance_IP/setup

We are going to run the setup
Start by hitting the URL https://appliance_IP/setup

Username: config
Password: dell


Add you existing SC and PS Storage Systems and you’re ready to rock and roll

Enterprise Wireless Access Points Benchmarks: Cisco, Aruba, Meraki, Aerohive

As more and more aspects of a business now require some type of mobility, the companies that sell you a way to connect them all-together are a dime a dozen. I have spent a considerable amount in my pursuit for wireless knowledge. I have also spent a LOT of time (just ask my wife) with some of these Access Points I have benchmarked and can say I know them fairly well. I’ve decided to take them head-to-head in some various tests and provide my readers with a quick and simplified version of the detailed data I collected during this process. A process that will be a “work in progress” as I find new testing criteria and new hardware to play with. Two of the tested access points are 802.11ac Wave 2 devices, which can provide over 1Gb of throughput using bonded links or MGIG. But all APs were tested with one 1Gb Ethernet (no LAGs)

The Access Points I will be benchmarking are:
Cisco Airnonet 1830i (802.11ac Wave 2)
Meraki MR42 (802.11ac Wave 2)
Meraki MR18 (802.11n)
Aruba 225 (802.11ac)
Aruba 205 (802.11ac)

Let me preface this with a disclaimer that I have no official training or degree in the methodologies of benchmarks. I have tried to take what I believe are some real world tasks a user will encounter daily, and tested them in the best way I know how. I will explain my testing environment, and how I chose that environment, and then move onto the actual benchmarks.

Client OS and Wireless Chipset
2015 Macbook Pro – OS X 10.11 (El Capitan): Broadcom BCM43602
Lenovo T450S – Win 10 Pro: Intel Dual Band AC-7265 (Integrated)
Lenovo T450S – Win 10 Pro: Netgear A6200 (USB 3 Adapter)

Results: I ran a 1GB file upload and download to a local server using each of the above clients. I ran these tests three (3) times on each, and took the averages of each and compared them with each other. I found they each were within ~1/20th of upload/download seconds, and throughput difference was also negligible. I used the Lenovo with integrated Intel chipset for the official benchmarks.

Environment
I placed each access point 9’ high and tested each client ~12’ away. I used the exact placement for each test. I only had one AP powered on during each test, and these tests were done in a very secluded area, with absolutely zero interference from neighboring wifi or Microwave signals. Acrylics Wifi Professional was used to verify this. Each Access Point was connected via POE. No other devices connected to the Access Points besides my client machine

Network Backbone
The bulk of these benchmarks tested for local upload/download speeds of files on the local LAN. I tested the Access Points using two switches. The first one being a Netgear GS728 TP and the second a Cisco Meraki MS350. Surprisingly, I was getting lower latency on the Netgear switch (between 1-3ms), and used the Netgear for the official benchmarks.

Internet Speed Tests
The Internet Speed Tests were semi-irrelevant, since some of these APs can download/upload much faster than my Internet Plan and modem allow. I am using Comcast Xfinity Blast (105 Down/10 Up), but it looks like Comcast is allowing me to burst above those speeds. I am using a Motorola Surfboard SC6121 DOCSIS 3.0 Modem, which has a ~172 Mbps max throughput, which would be the weakest link even if I had faster Internet. What is interesting though, is all these Access Points support multi-streams which should allow internet speeds on the 2.4 Ghz range to exceed the results I am getting in benchmarks. Am I missing something on this opinion?

2.4 Ghz vs 5 Ghz Tests and Features
Each Access Point offers its own array of extended features and configurations, some of which are unique to the access point. Most of these features really only shine under a multi-device scenario, so I think the single-device head to head benchmarks are fairly accurate, as these unique features aren’t needed. 5 Ghz tests were done by shutting off the 2.4 Ghz radios and vice versa. Attempt to “tweak” some of the default settings to more “optimized” ones had little effect, and in some cases made things worse. Again, these Access Points are made for the Enterprise and are built to handle multiple users with multiple devices. I welcome any feedback on any of these testing mechanisms.

Ok, now the good stuff. Here are the results! I ran each aspect of the benchmarks three (3) times and took the average of those results. Some results were surprising and seemed odd and were re-tested but results were similar. Here we go!

Test 1: 20 MB File Transfers over 5 Ghz Radios

Test 2: 20 MB File Transfers over 2.4 Ghz Radios

Test 3: 1 GB File Transfers over 5 Ghz Radios

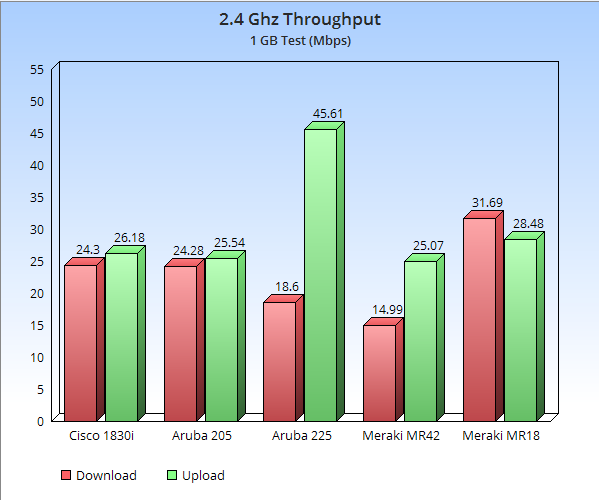
Test 4: 1 GB File Transfers over 2.4 Ghz Radios

More benchmarking to come. This is definitely a work in progress!

VMware vMotion Error: The Operation is not Supported on the Object

While trying to vMotion (Host and Storage), I kept getting the following error:
“The operation is not supported on this object”.

I noticed their switches were negotiating the vMotion NICs at 100/mb, which is unsupported by VMware. After messing with the customer’s switch, I was able to set those ports to 1000-full. But after doing so, I was still getting this error, and nobody online had a solution. After messing with it for 45 mins, I was able to resolve this by disabling vMotion on the NIC, and then re-enabling it. I assume the vMotion setting needed to be reset now that the NICs were set to 1000/mb.

Hope this helps

ESXi “Error loading /k.b00” “Fatal error: 33 (Inconsistent Data)

I was deploying ESXi 6 on a new server, booting off USB thumb-drive where I put the ESXi installer. (Installer creatred with Rufus), I got the following error just a few seconds into the install

Error loading /k.b00
Compressed MD5: 23a1XXXXXXXXXX
Decompressed MD5: 00000000000000000000000000
Fatal error: 33 (Inconsistent data)

Turned out to be a bad USB drive.
Bad (usually cheap generic drives) work well for storing files, but in my experience, lack the ability to be used as install media or “Live CD’s”. I am not sure what makes one drive work over the other, but assume it has to do with the controller interface on those drives.