Category Archives: Servers

Reset HPE ILO Password from vSphere ESXi Host

Changing the login password of the ILO Out-of-Band Management with an ESX host can be done by doing the following:

  1. Enable SSH on the host you need the ILO IP from
  2. SSH into the host using Putty or another SSH client
  3. Type: cd /opt/hp/tools

From here, we will create a new file that will contain the new credentials you want to use on the iLO going forward. You can create this file and copy to the above location using WinSCP,or use Vi to do this all within putty

4. Type: vi pwreset.xml
5. Type: i
(this will put you into insert mode and allow you to copy the below text so you don’t have to type it. Please use your own password on line 5)

<RIBCL VERSION="2.0">
<LOGIN USER_LOGIN="Administrator" PASSWORD="unknown">
<USER_INFO MODE="write">
<MOD_USER USER_LOGIN="Administrator">
<PASSWORD value="Enter-Your-Password-Here"/>
</MOD_USER>
</USER_INFO>
</LOGIN>
</RIBCL>

6. Press the Esc key
7. Type: :wq to save and exit the file
8. Type: ./hponcfg -f pwreset.xml to reset the iLO

You should now be able to login with your new credentials. The last step is to remove the file you just created.

9. Type: cd /opt/hp/tools
10. Type: rm -rf pwreset.xml

Infinio Accelerator: Server-Side Caching for Insane Acceleration

Server Side Caching isn’t a totally new concept, but it is a hot market right now as storage providers try and push the speed limits of their perspective platforms. The 3DXPoint water cooler talk is all the craze, even if the product isn’t available to its full potential.

Infinio is a server-side caching solution I have been benchmarking as a potential offering to customers, and I have been very impressed with the quick results. Being able to reduce Read latency (400% in my case) in as little as 15 mins, is what sold me.

Infinio Accelerator is built on three fundamental principles:

  1. The highest performance storage architecture is one where the
    hottest data is co-located with applications in the server
    As storage media has become increasingly faster, culminating in the
    ubiquity of flash devices, the network has become the new bottleneck. An
    architecture that serves I/O server-side provides performance that is
    significantly better than relying on lengthy round-trips to and from even
    the highest performing network-based storage. By serving most I/O with
    server-side speed, as well as reducing demands on centralized arrays,
    Infinio can deliver 10X the IOPS and 20X lower latency of typical storage
    environments.
  2. A “memory-first” architecture is required to realize the best
    storage performance
    RAM is orders of magnitude faster than flash and SSDs, but is price prohibitive
    for most datasets. Infinio’s solution to this problem is a
    content-based architecture, whose inline deduplication enables RAM to
    cache 5X-10X more data than its physical capacity. The option of evicting
    from RAM to a server-side flash tier (which may comprise PCIe flash, SSDs,
    or NVMe devices) offers additional caching capacity. By creating a tiered
    cache such as this, Infinio makes it practical to reduce the storage
    requirements on the server side to just 10% of the dataset. Long-term
    industry trends such as storage-class memory are another indication that a
    memory-first architecture is appropriate for this application.
  3. Delivering storage performance should be 100% headache-free
    Infinio’s software enables the use of server-side RAM and flash to be
    transparent to storage environments, supporting the use of native storage features like snapshots and clones, as well as VMware integrations like
    VAAI and DRS. The introduction of Infinio begins to provide value
    immediately after a non-disruptive, no reboot, 15 minute installation. This
    is in sharp contrast to server-side flash devices used alone, which can
    provide impressive performance results, but require significant
    maintenance and cumbersome data protection.

What does Infinio do exactly?

Infinio Accelerator is a software-based server-side cache that provides high
performance to any storage system in a VMware environment. It increases
IOPS and decreases latency by caching a copy of the hottest data on serverside
resources such as RAM and flash devices. Native inline deduplication
ensures that all local storage resources are used as efficiently as possible,
reducing the cost of performance. Results can be seen instantly following the
non-disruptive, 15-minute installation that doesn’t require any downtime, data
migration, or reboots. 70% of I/O request are Reads (on average), most of your I/O Reads will come directly from super-fast Ram

How does it actually work?

Infinio is built on VMware’s VAIO (vSphere APIs for I/O Filters) framework,
which is the fastest and most secure way to intercept I/O coming from a virtual
machine. Its benefits can be realized on any storage that VMware supports; in
addition, integration with VMware features like DRS, SDRS, VAAI and vMotion
all continue to function the same way once Infinio is installed. Finally, future
storage innovation that VMware releases will be available immediately through
I/O Filter integration.

In short, Infinio is the most cost-effective and easiest way to add storage
performance to a VMware environment. By bringing performance closer to
applications, Infinio delivers:
20X decrease in latency
10X increase in throughput
Reduced storage performance costs ($/IOPS) and capacity costs ($/GB)

Final Thoughts

Honestly, there could not be an easier solution that provides as dramatic results as Server-Side caching. Deploying Ininfio when you are in a performance jam provides immediate relief, and should be part of your performance enhancing arsenal. There is a free trial as well, and remember, there is no downtime to install or uninstall Infinio in your environment.

Please reach out to myself, or your Solution Provider to learn more and test drive Infinio Accelerator. NetWize IT Solutions.

Datrium Design – Architecture Matters

Lame Joke: What do you get when you stick NVMe-based SSD onto an All-Flash Array or Hyper-Converged Node?

Genuine Answer: A Bottleneck of course!

As flash technologies advance and increase in performance, existing (and upcoming) network infrastructure cannot meet the demands of Next-Gen NAND technologies, such as 3DXPoint.
This chart compares saturation rates of 10GbE, 40GbE, and 100GbE with various flash offerings.


Datrium was founded by Ex-Founders and Principal Architects of Companies like Data Domain and VMware, so it’s safe to say they know a thing or two about architecture. Their approach to overcoming some of the shortcoming in Traditional Converged and HyperConverged (HCI) platforms boils down to the following shift in architecture design:

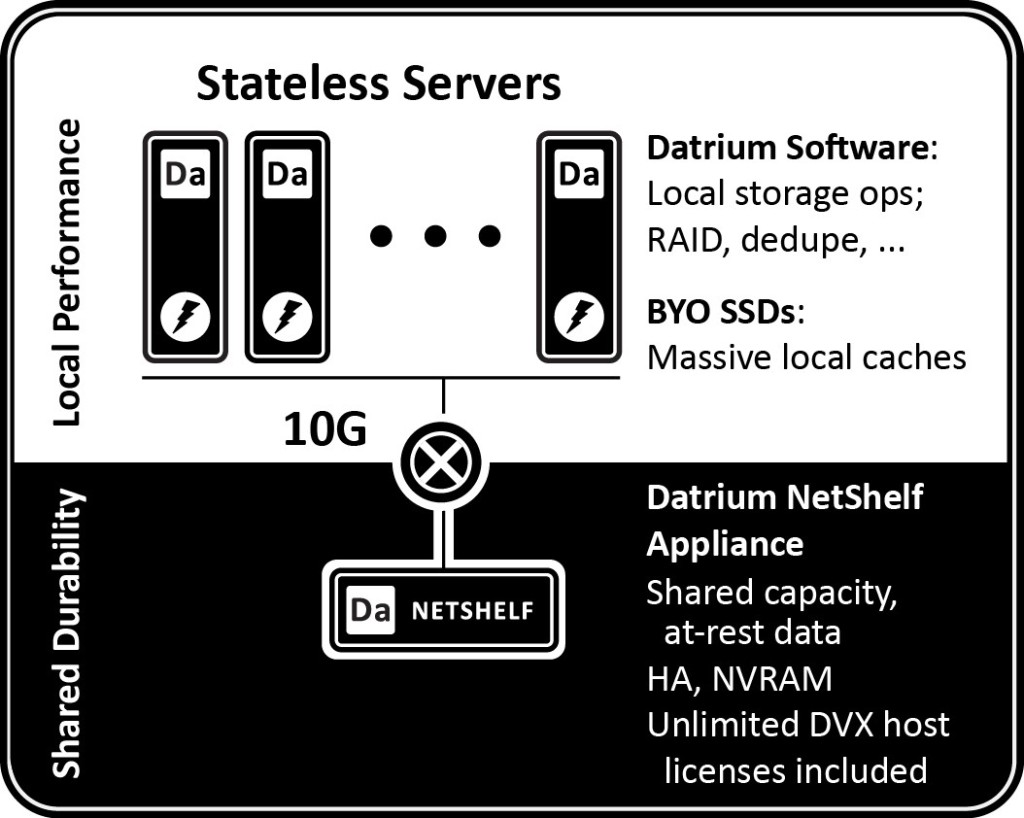
Move the I/O Processing to a stateless compute nodes

Architectural Overview
There are basically two components to Datrium’s Open Convergence architecture.

Compute Nodes
Computer Nodes are Servers of any brand the customer would like to use. The more RAM and Flash these servers have, the more powerful the overall architecture. Each Server Node get’s Datrium’s DVX software installed into the userspace on the hypervisor.
Every compute node is responsible for data services (Deduplication, Compression, Erasure Coding, and Encryption). These nodes pull copies of data from Data Nodes (the next component we will address shortly), and keep that data in a stateless fashion, before the data is sent to the Data Nodes.

Data Nodes
The DVX Data Nodes are Hybrid or All-Flash Disk Enclosures that are purchased from Datrium.  (You can’t use your own Data Nodes). Since all data is processed on the server nodes, there is no data processing happening at the data node layer. This allows the data nodes to keep data that is only accessed if the data copies are not available in flash/cache on the compute nodes. The data that resides on the data nodes is heavily protected for resiliency.

Open Convergence is Datrium’s marketing term for this improved architecture, but taking the marketing out of the discussion, here is how Datrium solves for business outcomes:

  1. Simpler than HyperConverged
    – Zero HCI Cluster configuration or cluster sprawl
    – Independently and Simply provision compute or storage
    – Flexibly support any mix of hosts or hypervisors
    – No vendor lock-in on compute resources. Use existing compute hardware
  2. Faster than All-Flash Arrays
    – Flash is on the server, where is performs much faster
    – No Controller Bottlenecks
    – Performance scales with each server
  3. No Backup Silos
    – One console for VM consolidation and data protection
    – Reduce Management time for Backup, DR, Copy Data Management
    – Eliminate dedicated backup devices

Image result for datrium architecture

If you need a lightning fast, resilient, scalable, cloud-enabled architecture, Datrium might be exactly what you need. Because in the end,  Architecture Matters.


How to find HPE Proliant Serial Number from Command Prompt

I was trying to find a serial number for an HP (HPE) Proliant Server, and the System Management Agent wasn’t displaying the info and I didn’t have access to the iLO. I found the following workaround from a user on a forum.

Open a commands prompt and type:

wmic /node:%computername% bios get serialnumber

To find the Serial of a remote computer, type the following:

wmic /node:HOSTNAME bios get serialnumber


While attempting to upgrade a ESXi host from 6.0.0.3073146 to the latest 6.x build (6.0.0.update02-4192238) via CLI (see my post here about pathcing via CLI)

I got the following error:

[DependencyError]
VIB VMware_bootbank_esx-base_6.0.0-2.43.4192238 requires vsan >= 6.0.0-2.43, but the requirement cannot be satisfied within the ImageProfile.
VIB VMware_bootbank_esx-base_6.0.0-2.43.4192238 requires vsan << 6.0.0-2.44, but the requirement cannot be satisfied within the ImageProfile.
Please refer to the log file for more details.

The exact build on the error may be different on yours, but the issue is the same. I found this KB from VMware and decided to make a post that gets right to the point: VMware KB

This error occurs because the newest version of VSAN (which is built into ESXi) is looking for a specific base hypervisor build (esx-base). In order to run the update successfully, you’ll need to define the update profile for the VIB you are using. Its actually a lot easier than it may sound.

First, lets find the software profile the VIB you will be using contains. Run the following command, pointing the destination to the .zip VIB you uploaded to a datastore on the host.

esxcli software sources profile list -d <location_of_the_esxi_zip_bundle_on_the_datastore>

It will output something similiar to this:

That Name is the Profile you will need to add to your update command.
So in my case, the update command would look like this (highlighting added for emphasis):

esxcli software profile update -d /vmfs/volumes/datastore1/VMware-ESXi-6.0.0.update02-4192238.x86_64-Dell_Customized-offline-bundle-A04.zip -p Dell-ESXi-6.0U2-4192238-A04

It should update and finish with no errors:

The final step is to issue a reboot command, and you are done.

Create Bootable VMware ESXi Installer USB Drive

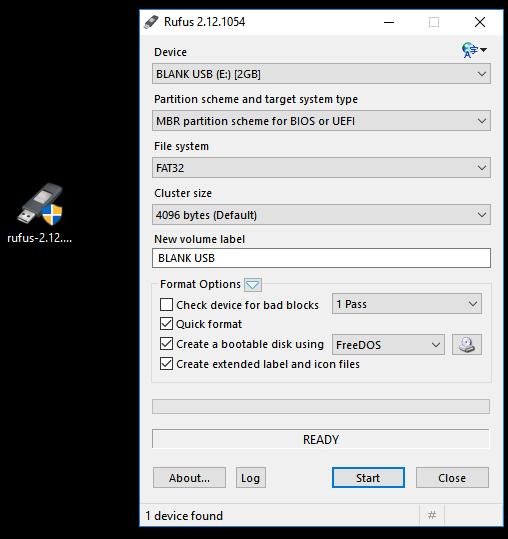
Getting ESXi installed on a server today is more often done through the servers BMC (iLO, iDRAC, CMC, etc). But this guide might be helpful when installing vSphere on a standalone server. The tool of choice for any bootable USB is my friend Rufus.

There are three things you will need to do this:

  • Download Rufus Here
  • Download whatever .iSO image you want to be bootable (whether its WIndows, ESXi, or Linux).
  • Use a somewhat quality USB Flash Drive (1GB or larger). For some reason, I will run into some cheap-o thumb drives that do not boot anything. If your boot drive doesn’t work, try a different flash drive


Here are the easy steps:

  • Insert your blank (or soon to be formatted) flash drive into your PC
  • Open Rufus

  • Under Device, select the flash drive you wish to format and use
  • Select MBR partition Scheme for BIOS or UEFI
  • Filesystem = Fat32
  • Use default Cluster Size (4096 bytes)
  • Click the icon next to FreeDOS and select your ISO image
  • Rename the New Volume Label to whatever you wish to see when you insert the flash drive into a PC
  • Click Start

  • When prompted to replace menu.c32, select Yes

  • Finally, click Yes to the warning that this flash drive will be formatted (destroyed)


That’s it. It will take a couple of mins, but you should have a bootable flash drive.

vSphere 6 Upgrade Fails – “The Upgrade contains the following set of conflicting VIBs:”

I was upgrading an ESXi 5.5 host for a client and ran into some “Incompatibility” errors. They had a mix of Dell server hosts, but three of them were Dell R715’s and all three were getting upgrade errors. I first tried the update using VMware Update Manager (VUM), and made sure I was using the Dell Customized ISO, which includes Dell specific drivers. (You can download the ISO here: http://goo.gl/3UOeNV ).

After adding the ISO to a new upgrade baseline and scanning the host for updates, I was the following errors:
Compliance State: Incompatible
The upgrade contains the following set of conflicting VIBs:
Mellanox_bootbank_net-mlx4-en_1.9.9.0-1OEM.550.0.0.1331820
Remove the conflicting VIBs or use Image Builder to create a custom upgrade ISO image that contains the newer versions of the conflicting VIBs, and try to upgrade again.

Attempt to continue the upgrade and dismiss the errors, resulted in upgrade failure. Any attempt to upgrade via the CLI also failed.

So what is the problem and how do you fix it?

The problem is with incompatible drivers that are currently on the host. Drivers that aren’t supported by ESXi 6, and drivers that aren’t included in either VMware’s or Dell’s ISO.
This particular VIB is a Mellanox Infiniband HBA, which probably most of us seeing this error do not use.

To remedy this issue and proceed, we need to remove those drivers from the host.

First, enable SSH on the host that has the issue
Next, SSH into the host and run the following commands:

~ # esxcli software vib list | grep Mel
~ # esxcli software vib remove -n net-mlx4-en
~ # esxcli software vib remove -n net-mlx4-core
~ # reboot

It may take a min or so after running commands two and three, but it should complete successfully. After rebooting the host, proceed to upgrade via Update Manager or CLI.

After I completed the above instructions and scanned my host again with Update Manager, it found one more incompatible VIB that I had to remove on all three servers.

Compliance State: Incompatible
The upgrade contains the following set of conflicting VIBs:
VMware_bootbank_xhci-xhci_1.0-3vmw.550.3.78.3248547
Remove the conflicting VIBs or use Image Builder to create a custom upgrade ISO image that contains the newer versions of the conflicting VIBs, and try to upgrade again.

I was able to fix this in the same manner I did the previous VIB:

~ # esxcli software vib list | grep Mel
~ # esxcli software vib remove -n xhci-xhci
~ # reboot

VMware Consumed Host Memory vs Active Guest Memory

I get asked frequently, what is the difference between the Consumed Host Memory of a VM (shown in the VM Resources), and the Active Guest Memory. This explanation is technical, but answers the question correctly.

Consumed Host Memory usage is defined as the amount of host memory that is allocated to the virtual machine.

Active Guest Memory is defined as the amount of guest memory that is currently being used by the guest operating system and its applications.


But here is the technical aspect of it all:

1) Why is consumed host memory usage higher than active guest memory?

“The hypervisor knows when to allocate host physical memory for a virtual machine because the first memory access from the virtual machine to a host physical memory will cause a page fault that can be easily captured by the hypervisor. However, it is difficult for the hypervisor to know when to free host physical memory upon virtual machine memory deallocation because the guest operating system free list is generally not publicly accessible. Hence, the hypervisor cannot easily find out the location of the free list and monitor its changes.”

So the host allocates memory pages upon their first request from the guest (that’s why consumed is less than the configured maximum), but doesn’t deallocate them once they are freed in the guest OS (because the host simply doesn’t see those guest deallocations). If the guest OS re-uses such previously allocated pages, the host won’t allocate more host memory. If the guest OS however allocates different pages, the host will also allocate more memory (up to the point where all configured memory pages for the specific guest have been allocated).

 2) How is active guest memory calculated? 

“At the beginning of each sampling period, the hypervisor intentionally invalidates several randomly selected guest physical pages and starts to monitor the guest accesses to them. At the end of the sampling period, the fraction of actively used memory can be estimated as the fraction of the invalidated pages that are re-accessed by the guest during the epoch”.

In other words, the active guest memory is calculated from outside the guest by an approximation on the hypervisor level.

Get iDrac to work with Chrome and FireFox

I’ve been able to use Dell’s Remote Console, iDRAC 6, to work with Google Chrome without any issues. You can login to the web interface and navigate all of the menus without any re-configuration to the iDRAC settings. However to launch the Virtual Console and Virtual Media interface, you must make one adjustment. You must change the virtual console from Native to Java and specify the javaws.exe as the launcher for the JNLP file that will download.

1. Log into the web interface for iDRAC.
2. Select System from the right menu and then click Console/Media.
3. Select the Configuration screen menu
4. In the Virtual Console section, locate the Plug-in Type drop-down menu and select Java (Native is the default)

5. Click Apply at the bottom of the screen.
6. Select the Virtual Console and Virtual Media screen and then click Launch Virtual Console to launch the server console.
7. The file viewer.jnlp will download. Once the download is complete, click on the file download notification in Google Chrome to open it.
8. Click the Select a program from a list of installed programs radio button and click OK.

9. Click Browse…
10. Navigate to the Java Runtime installation directory on your computer and open the BIN folder (the complete path on my computer, which has a default installation, is C:\Program Files\Java\jre7\bin)
11. Select javaws.exe from the list of files and click Open. (This program file is called the Java(TM) Web Start Launcher)
12. Check the box Always use the selected program to open this kind of file and click OK.

13. Confirm any security or firewall prompts that appear.

That should be it. If you get the following error, you might have to change some setting in Java:

Error Message: Missing required permissions manifest attribute in main jar

This error appears with newer versions of Java, and you’ll need to do the following:

1. Open Control Panel
2. Click on Java

3. Click on the Security Tab, and then “Edit Site List”
4. Enter the iDrac URL in the List

Now you should be able to follow the above steps and open the .jar file and get to the console!

If you found this article to be helpful, please support us by visiting our sponsors’ websites.