As more and more aspects of a business now require some type of mobility, the companies that sell you a way to connect them all-together are a dime a dozen. I have spent a considerable amount in my pursuit for wireless knowledge. I have also spent a LOT of time (just ask my wife) with some of these Access Points I have benchmarked and can say I know them fairly well. I’ve decided to take them head-to-head in some various tests and provide my readers with a quick and simplified version of the detailed data I collected during this process. A process that will be a “work in progress” as I find new testing criteria and new hardware to play with. Two of the tested access points are 802.11ac Wave 2 devices, which can provide over 1Gb of throughput using bonded links or MGIG. But all APs were tested with one 1Gb Ethernet (no LAGs)
The Access Points I will be benchmarking are:
Cisco Airnonet 1830i (802.11ac Wave 2)
Meraki MR42 (802.11ac Wave 2)
Meraki MR18 (802.11n)
Aruba 225 (802.11ac)
Aruba 205 (802.11ac)
Let me preface this with a disclaimer that I have no official training or degree in the methodologies of benchmarks. I have tried to take what I believe are some real world tasks a user will encounter daily, and tested them in the best way I know how. I will explain my testing environment, and how I chose that environment, and then move onto the actual benchmarks.
Client OS and Wireless Chipset
2015 Macbook Pro – OS X 10.11 (El Capitan): Broadcom BCM43602
Lenovo T450S – Win 10 Pro: Intel Dual Band AC-7265 (Integrated)
Lenovo T450S – Win 10 Pro: Netgear A6200 (USB 3 Adapter)
Results: I ran a 1GB file upload and download to a local server using each of the above clients. I ran these tests three (3) times on each, and took the averages of each and compared them with each other. I found they each were within ~1/20th of upload/download seconds, and throughput difference was also negligible. I used the Lenovo with integrated Intel chipset for the official benchmarks.
Environment
I placed each access point 9’ high and tested each client ~12’ away. I used the exact placement for each test. I only had one AP powered on during each test, and these tests were done in a very secluded area, with absolutely zero interference from neighboring wifi or Microwave signals. Acrylics Wifi Professional was used to verify this. Each Access Point was connected via POE. No other devices connected to the Access Points besides my client machine
Network Backbone
The bulk of these benchmarks tested for local upload/download speeds of files on the local LAN. I tested the Access Points using two switches. The first one being a Netgear GS728 TP and the second a Cisco Meraki MS350. Surprisingly, I was getting lower latency on the Netgear switch (between 1-3ms), and used the Netgear for the official benchmarks.
Internet Speed Tests
The Internet Speed Tests were semi-irrelevant, since some of these APs can download/upload much faster than my Internet Plan and modem allow. I am using Comcast Xfinity Blast (105 Down/10 Up), but it looks like Comcast is allowing me to burst above those speeds. I am using a Motorola Surfboard SC6121 DOCSIS 3.0 Modem, which has a ~172 Mbps max throughput, which would be the weakest link even if I had faster Internet. What is interesting though, is all these Access Points support multi-streams which should allow internet speeds on the 2.4 Ghz range to exceed the results I am getting in benchmarks. Am I missing something on this opinion?
2.4 Ghz vs 5 Ghz Tests and Features
Each Access Point offers its own array of extended features and configurations, some of which are unique to the access point. Most of these features really only shine under a multi-device scenario, so I think the single-device head to head benchmarks are fairly accurate, as these unique features aren’t needed. 5 Ghz tests were done by shutting off the 2.4 Ghz radios and vice versa. Attempt to “tweak” some of the default settings to more “optimized” ones had little effect, and in some cases made things worse. Again, these Access Points are made for the Enterprise and are built to handle multiple users with multiple devices. I welcome any feedback on any of these testing mechanisms.
Ok, now the good stuff. Here are the results! I ran each aspect of the benchmarks three (3) times and took the average of those results. Some results were surprising and seemed odd and were re-tested but results were similar. Here we go!
Test 1: 20 MB File Transfers over 5 Ghz Radios

Test 2: 20 MB File Transfers over 2.4 Ghz Radios

Test 3: 1 GB File Transfers over 5 Ghz Radios

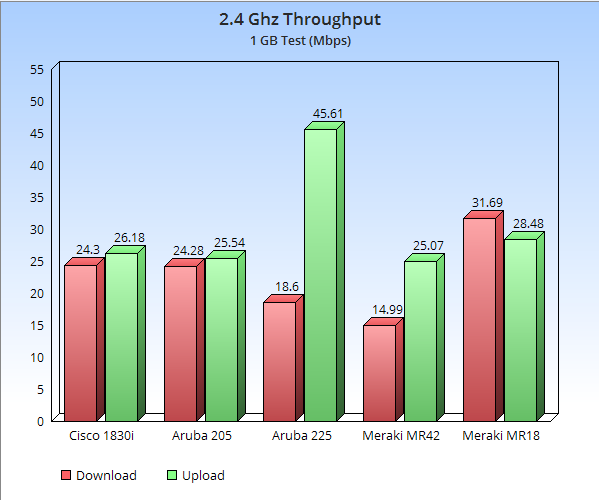
Test 4: 1 GB File Transfers over 2.4 Ghz Radios

More benchmarking to come. This is definitely a work in progress!


